|
Forums >> Revit Building >> Technical Support >> Filled region
|
|
|
active
Joined: Tue, Dec 19, 2006
140 Posts
 |
Hi there Old problem but been a novice I still puzzled by in spite reading previous question and answer in the forum. Way when I draw a Fill Region pattern, I can see it in elevation but not in 3D? Or if I asked the question in a deferent way how can I make it to be seen? Nirim
|
This user is offline |
|
 |
|
|
|
active
Joined: Sun, Apr 25, 2004
1207 Posts
 |
Filled regions are'drafting' items that are view specific and cannot be seen in 3D. What is it you are trying to accomplish?
-----------------------------------
Tom www.reviteer.com http://twitter.com/Reviteer |
This user is offline |
View Website
|
|
|
active
Joined: Tue, Dec 19, 2006
140 Posts
|
Hi TomDorner Sorry for the dely in my replay , I wasn’t at the office. the thing that I want to achieve is to be dale to see the hatch pattern on both elevation and in 3D model.
Nirim
|
This user is offline |
|
|
|
site moderator|||
Joined: Tue, May 16, 2006
13079 Posts
 |
Filled regions are not for 3d work. Instead, use a 3d hatch as the surface pattern for whatever you want it on . ie: Walls - select a wall type - open its properties - select edit then edit structure - click on the material pull-down for the outside surfaces and from there you can choose the surface pattern. - For the exteror for some surfaces like walls, floors & roofs, you can also edit face and pour a 3d hatch on the surface.
|
This user is offline |
|
|
|
active
Joined: Tue, Dec 19, 2006
140 Posts
|
Thanks Tom But what do you mean 3d hatches? Is there way to know which is the 3d hatch pattern in the pattern list, and also the effect that I wont to achieve is a stone work patches like in bot 2D and 3D and no to fill the entire wall surface. Nirim
|
This user is offline |
|
|
|
active
Joined: Tue, Dec 19, 2006
140 Posts
|
sorry it supposed to be thanks WWHub however thanks to everybody
|
This user is offline |
|
|
|
site moderator|||

Joined: Mon, Jan 12, 2004
2889 Posts
|
Sounds like you are still thinking in 2D autocad ways... I suggest you have another look at the tutorials in revit. But, basically materials can have hatches assigned to them. each materials has a cut hatch pattern and a surface hatch pattern. Access them in Settings-->Materials Cut patterns must be "drafting" type fill patterns (Have a look in settings-->Fill Patterns, there are two types drafting and model) Drafting patterns have a "print scale", Model patterns have a real world scale and thus, appear differently depending on the scale of the view. In revit you do not, create elements then draw filled regions in plan/section/elevation to represent their material. Instead you give the elements the correct material in the properties and based on what matieral you've selected dictates how they display in section/plan/elevation. HTH.
-----------------------------------
Regards,
Chris.
Co-Founder | BIM Consultant | Software Designer  B. Arch) B. Arch)
Xrev Revit API Addins | Revit Rants |
This user is offline |
View Website
|
|
|
active
Joined: Tue, Dec 19, 2006
140 Posts
|
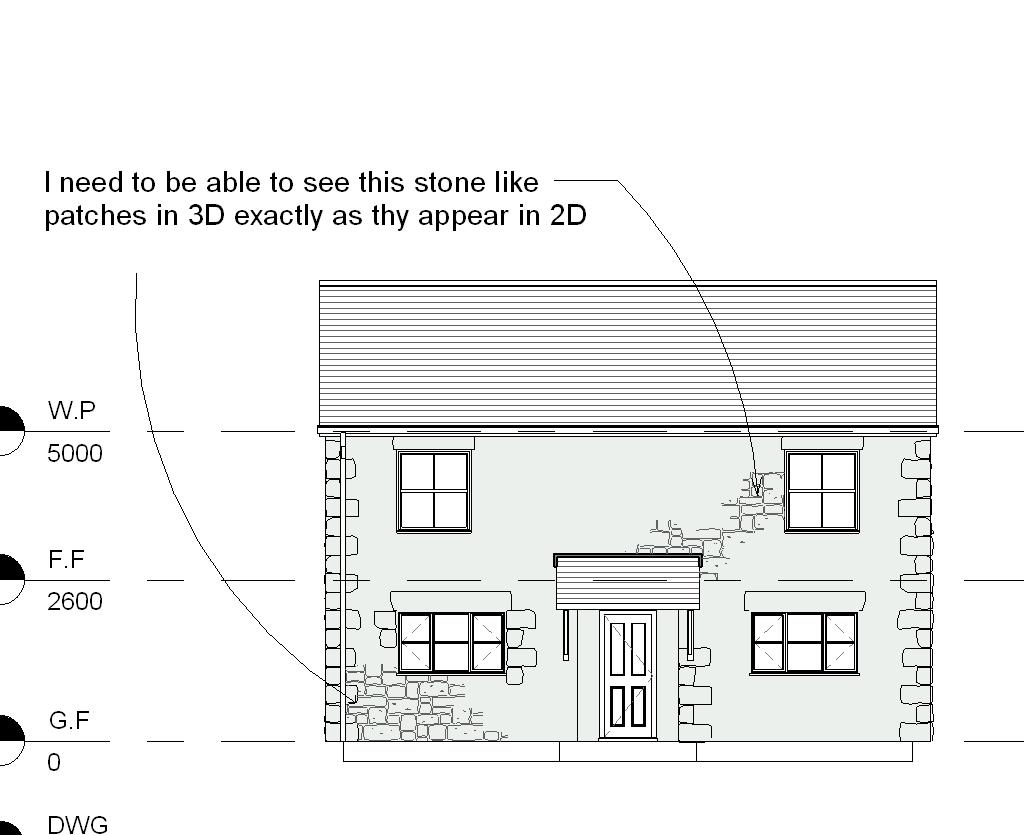
Hi there Mr Spot I understand all of the above but as I wrote to WWHud what I need is to be able to see both in 2D and 3D the stone patch like effect on the surface of the wall and not the entire wall cover by stone like pattern , see attach file. Regards Nirim
|
This user is offline |
|
|
|
active
Joined: Tue, Dec 19, 2006
140 Posts
|
Sorry to bother you all but I think I find a solution: I chose cobble like pattern for the wall finish material and then mask part of the wall surface and the quoins. Nirim
|
This user is offline |
|
|
|
site moderator|||
Joined: Mon, Jan 12, 2004
2889 Posts
|
Well it would've been a lot easier for us to help if you had've posted that image to begin with... As you can see by your responses nobody knew that was what you were after. To achieve what you want your only real options are to: A. Create a hatch pattern that is already 'patchy' like that. B. Use the split face tool to break up the wall into different sections and apply different materials to each section ie: with and without hatch patterns. C. Use model lines with the wall face set as the work plane and draw the patterns on. D. As i think you suggested, create another thin wall in front to conceal the hatch in the unwanted sections... HTH.
-----------------------------------
Regards,
Chris.
Co-Founder | BIM Consultant | Software Designer B. Arch)
Xrev Revit API Addins | Revit Rants |
This user is offline |
View Website
|
|
|