|
Forums >> Community >> Newbies >> Pattern Origin
|
|
|
active
Joined: Thu, Aug 17, 2006
9 Posts
No Rating |
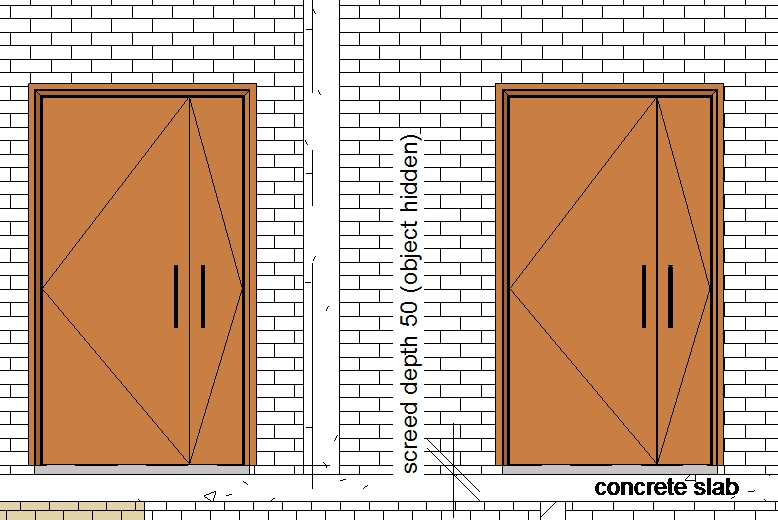
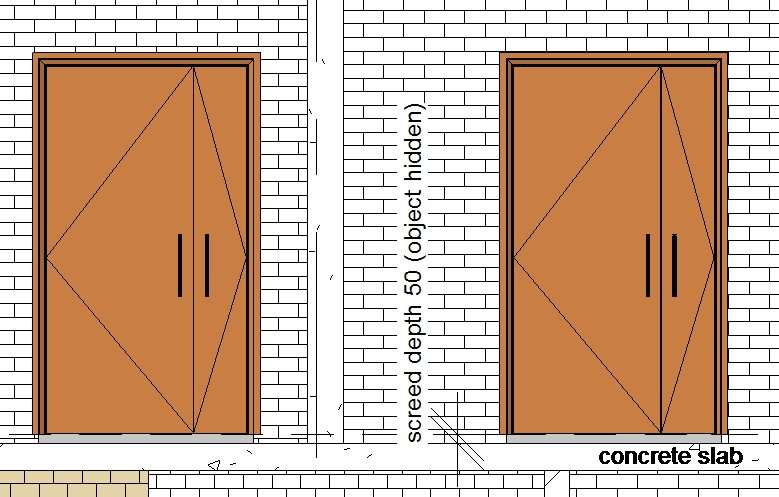
I am preparing a model of an existing building which uses imperial size bricks. I have therefore adapted the standard pattern file to suit the new size (see attached). When applied to the walls the pattern appears to start at finished floor level (see pattern y=0.jpg). The walls are built off the slab with a 50mm (2" screed and I want the coursing to start from this level as the bottom 2 courses are dark blue engineering brick (not shown). I changed the y coordinate to 25, but when applied to the internal fairfaced walls the pattern is not always aligned correctly - right hand wall appears to go up (correct), left hand wall wall pattern appears to go down (wrong!) screed and I want the coursing to start from this level as the bottom 2 courses are dark blue engineering brick (not shown). I changed the y coordinate to 25, but when applied to the internal fairfaced walls the pattern is not always aligned correctly - right hand wall appears to go up (correct), left hand wall wall pattern appears to go down (wrong!)  see pattern y=25.jpg). However if I redraw the walls (something I am trying to avoid!) then the pattern is applied correctly. Is there a way of collectively adjusting the origin point of the walls so that they all correctly coordinated? The walls, which are seperated by a concrete column, have identical properties and were drawn at the same time. see pattern y=25.jpg). However if I redraw the walls (something I am trying to avoid!) then the pattern is applied correctly. Is there a way of collectively adjusting the origin point of the walls so that they all correctly coordinated? The walls, which are seperated by a concrete column, have identical properties and were drawn at the same time. Thanks for any thoughts on this, Matthew
|
This user is offline |
|
 |
|
|
|
site moderator|||

Joined: Tue, May 22, 2007
5921 Posts
 |
Hi, if i understand what do you want, why don't you use the "Align" command to adjust/place (and lock) your pattern like do you want? if that's what do you mean...
-----------------------------------
I Hope and I Wish to LEARN more, and more, and more.... REVIT |
This user is offline |
|
|
|
active
Joined: Tue, Apr 12, 2005
1310 Posts
|
Hi Matthew You can simply move the lines to where you want them - use the tab to select the hatch line and move it to the correct position.
|
This user is offline |
View Website
|
|
|
site moderator|||
Joined: Tue, May 16, 2006
13079 Posts
 |
mkinross, Please note that your pattern must be a 3d pattern not 2d. If it is 3d, you can do what the other posters suggested.
|
This user is offline |
|
|
|
active
Joined: Tue, Apr 12, 2005
1310 Posts
|
Hi WWhub Please explain what you mean by 3d pattern - I would have thought that the brick pattern applied to a wall was 3D, but this method works for any model pattern, even used in a filled region, which is 2D.
|
This user is offline |
View Website
|
|
|
site moderator|||
Joined: Tue, May 16, 2006
13079 Posts
|
tim123, When I say 3D, I mean model hatch.You can assign 2d or 3d(model) hatch patterns to any material. 2d (drafting patterns) can not be adjusted like model patterns.
|
This user is offline |
|
|
|
active
Joined: Thu, Aug 17, 2006
9 Posts
No Rating |
Thanks for the suggestions - the problem with align is twofold : 1 Without looking at each segment of wall in elevation I don't know on which walls the hatch is placed correctly (there are probably in excess of 100 drawn segments which I am modifying) 2 After finding the incorrect walls I would have to align each one individually which will take a long time, and then when drawing any new walls double check to see if it is right or not. I suspect that this is one of those CAD things where had I set it up correctly in the first place I would not have the problem, but retromodifying the hatch is causing it to interact with all sorts of marginal factors such as which way the wall was drawn, or how it joins up with the adjacent wall etc. etc. Its almost as if on one one wall the hatch has ben drawn upside down - is this possible? Matthew
|
This user is offline |
|
|
|
site moderator|||
Joined: Tue, May 16, 2006
13079 Posts
|
I do not believe there is any way that the surface hatch pattern affects the way a wall interacts with anything else so if you are seeing something happening, your problem is elsewhere. I believe that REVIT starts all surface hatch patterns at the beginning (placement) of the wall. If your wall starts at the floor, the pattern starts at the floor. You are quite right in stating that this is something that is best kept track of when you place the object. But this is no different than it would be in AutoCAD in that respect except it is so much easier to do. As far as fixing it afterward, just draw a drafting line across your project and align to it.... or use the floor line if that is already correct.
|
This user is offline |
|
|
|
active
Joined: Thu, Aug 17, 2006
9 Posts
No Rating |
Ok - I have just made a discovery - when the amended .pat file is applied with y=25 which changes the vertical location of the hatch, it behaves differently on each side of the wall. The "finish face interior" shows the wall hatch correctly - "finish face exterior" shows it incorrectly (or perhaps I should say differently!) It makes no difference if the base is offset or not, in the examples attached to the original mailing the base has been offset by -50mm, but if this changed to 0 the hatch does not move - I think the coodinate 0,0 relates to the level not to the actual edge of the wall. The good news is that if the incorrect hatch is aligned with the slab this does not change the alignment of the hatch on the other side of the wall. I have checked about 20 wall segments and this applies to each one. All the above also applies to a newly drawn wall which includes the correct offset and amended material definition, so although generally true my comment about setting it up correctly in the first place does not particularly apply here. I would be happy to apply the align solution if it worked for all faces but I am going to have trawl around each wall face (including exetrnal walls) to set each one right. I have tried selecting a number of walls and then using TAB to get the selection right - but it only works on each panel seperately, the alignment does not fix all the selected walls. There must be a simpler and more elegant solution (of course I could construct each wall from 2 leaves .......). If you've read this far thanks for your patience! Matthew
|
This user is offline |
|
|
|
active
Joined: Thu, Aug 17, 2006
9 Posts
No Rating |
Brief further comment - I checked with some other patterns which come with Revit and those that have an offset in the y co-ordinate have the same problem - look at 'wood boards' for example. Matthew
|
This user is offline |
|
|
|
|
|
active
Joined: Thu, Aug 17, 2006
9 Posts
No Rating |
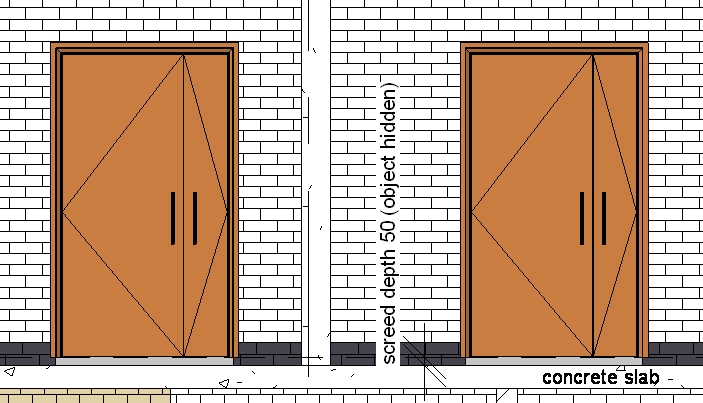
Solution - not ideal but one has to keep an eye on the job at hand rather than trying to rewrite the software. In the attached jpg I have introduced an additional level for the first floor slab and set the walls to this level with no offset. The y axis origin is now at the base of the wall so the coursing is correct. The y axis is clearly set to align with the relevant level. I have not simply changed the floor level as this would change all the height settings for windows, stairs, furniture etc etc.. This works and also applies to the sweep at the base of the wall which is 2 courses of dark blue engineering bricks. However if you look carefully you will see that the perpends on the sweep do not consistently line through with the perpends on the wall ........ sigh, but life is too short and I can live with this. If your still with me thanks for listening - but it would be useful to find a way of bringing this to the attention of Autodesk - to my mind the application of a wall surface hatch should be the same regardless of which side you are looking at. Matthew btw - I do appreciate that being able to engage with the software at this level is really powerful and the simplicity and speed with which one can accurately and reliably (i.e. zero crashes) tweek the model is fantastic. I have now opened this in R2009 and the same applies.
|
This user is offline |
|
|
|
active
Joined: Tue, Apr 12, 2005
1310 Posts
|
Matthew With regard to the perpends, hover your mouse over the perpend and hit the tab key until the perpend highlights. Click this and move it to where you want it. This can be snapped to a wall or line or ref plane so is quite accurate.
|
This user is offline |
View Website
|
|
|
active
Joined: Thu, Aug 17, 2006
9 Posts
No Rating |
This works for a specific panel - and if you are preparing a view for a plot it would then be worth doing. Thanks for the help, Matthew
|
This user is offline |
|
|
|