Forums
|
Forums >> Revit Building >> Technical Support >> edit profile precast stair
|
|
|
active
Joined: Wed, Feb 12, 2014
0 Posts
No Rating |
Hi all,
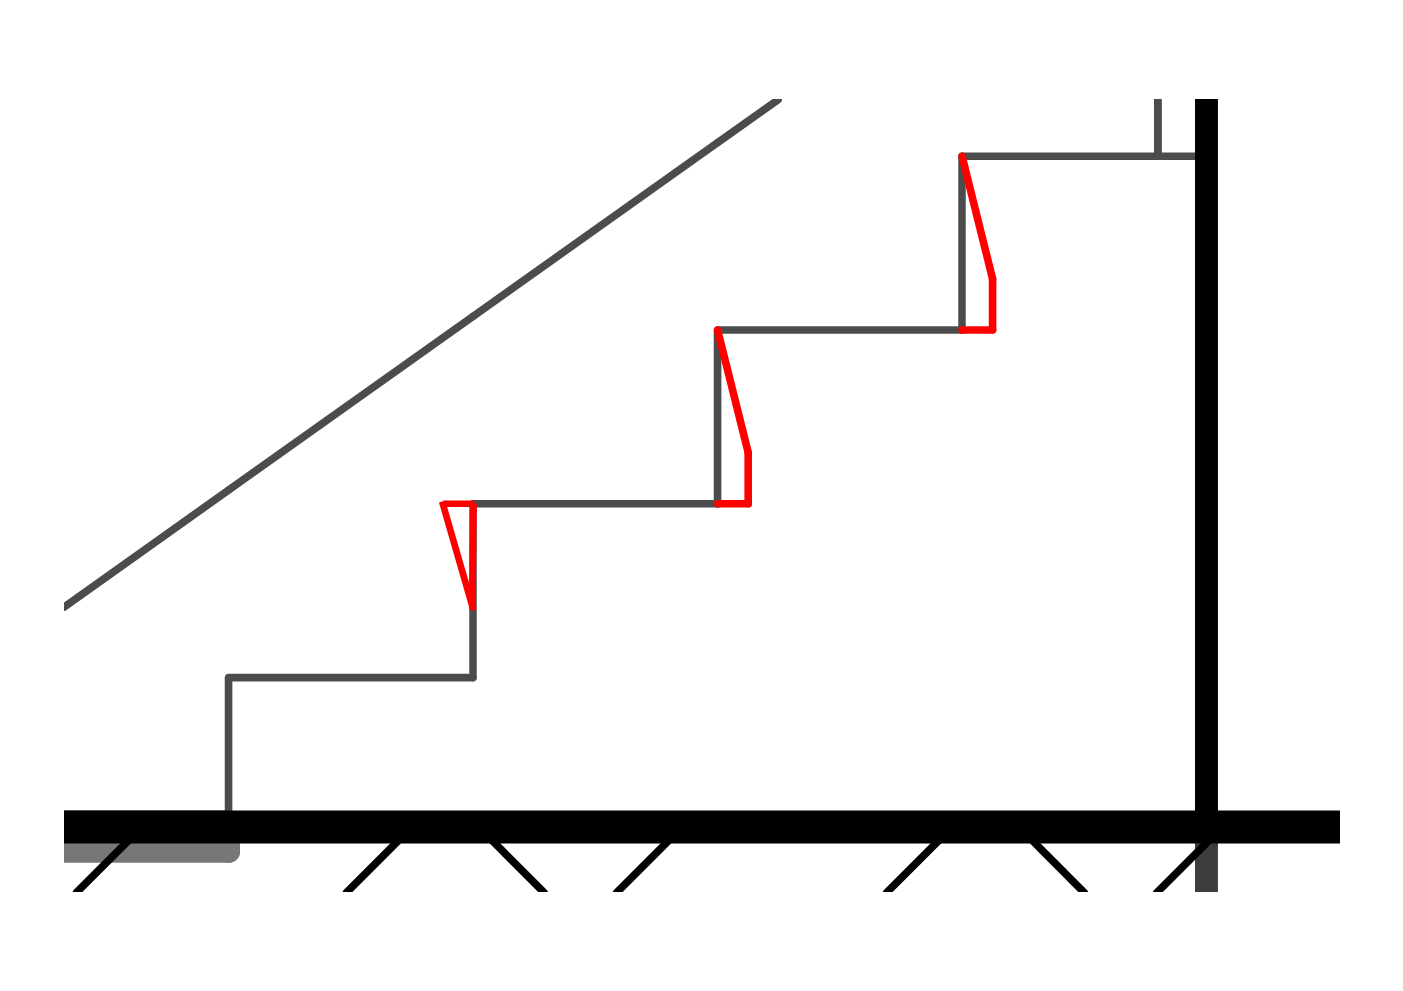
I'm currently working on a precast stair, but I wanna use another type of profile like you can see at the attached image marked in red. I tried already to create a new metric profile and use it in the properties under monolithic run but I cannot still reach the right outcoming. Maybe I do not use the correct way to edit new profiles and use it in the correct way? Also I do wanna join the profile with the same material as the precast stair like it's one massive stair.
Hope someone can advice me :-)
|
This user is offline |
|
 | |
|
|
active

Joined: Fri, Sep 3, 2010
0 Posts
 |
Instead of subtracting from the step, try adding to it. Add a nosing profile to a tread as on the picture. You will have to adjust a tread depth accordingly.
|
This user is offline |
|
|
|
active
Joined: Wed, Feb 12, 2014
0 Posts
No Rating |
The strange thing for me is that I need to mark the tread option and have to give a tread tickness to above 0. I cannot adjust the profile in vertical way for example.
|
This user is offline |
|
|
|
active
Joined: Fri, Sep 3, 2010
0 Posts
|
I’m sorry, but I don’t think I follow you. Why do you want to apply a tread thickness for? Can you elaborate on that and even upload your stair for us to take a look?
You can always make the profile parametric, so you can create different types in your project and swap them if desired, if that’s what you’re looking for. If you need help with that, let us know.
|
This user is offline |
|
|
|
active
Joined: Wed, Feb 12, 2014
0 Posts
No Rating |
Here is a link where you can download my file and you will see 2 precast stairs. A parametric profile would be for sure interesting.
https://app.box.com/s/8hcwfqv63bsqhad3cj5ap0yxr8r4lfqd
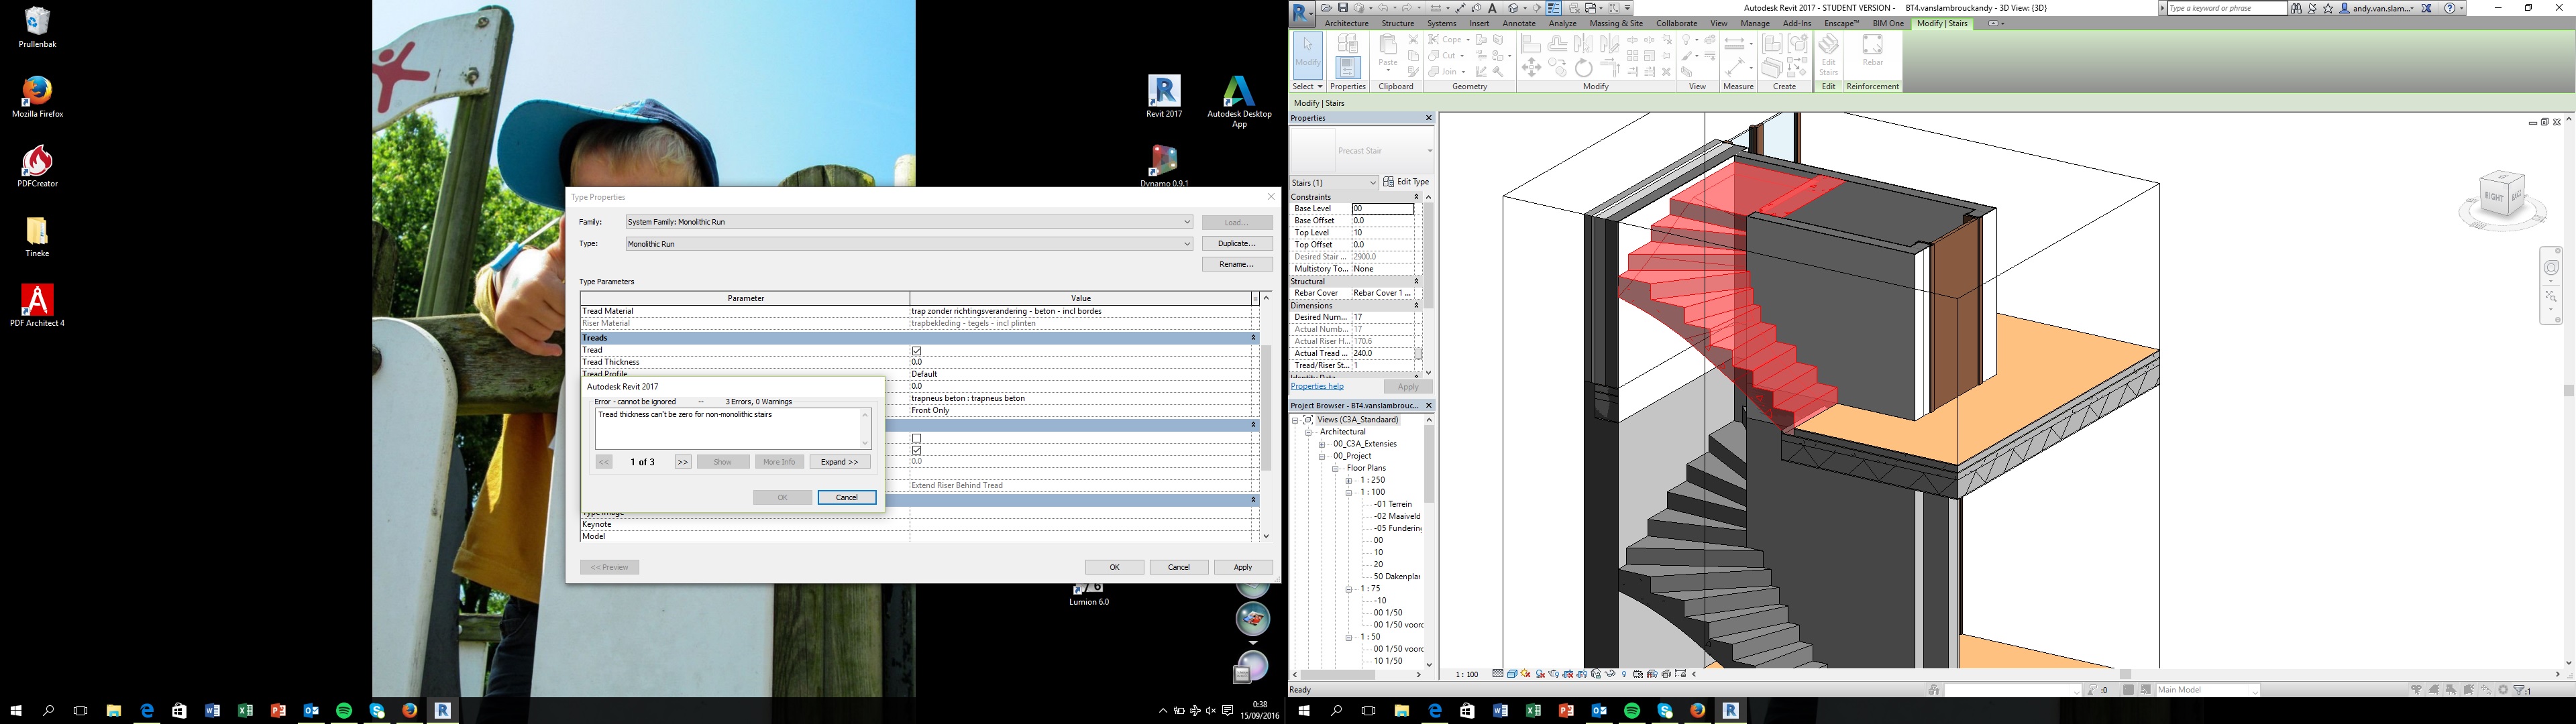
I added also a screenshot where you can see I added a profile and when I wanna apply I get an error because of I cannot give a thickness zero. When I do give a thickness my profile is not positioned in vertical way like I wanted to be.
Maybe it's just a small thing I do not correct or so but I try to learn much on my own for new things about revit.
|
This user is offline |
|
|
|
active
Joined: Fri, Sep 3, 2010
0 Posts
|
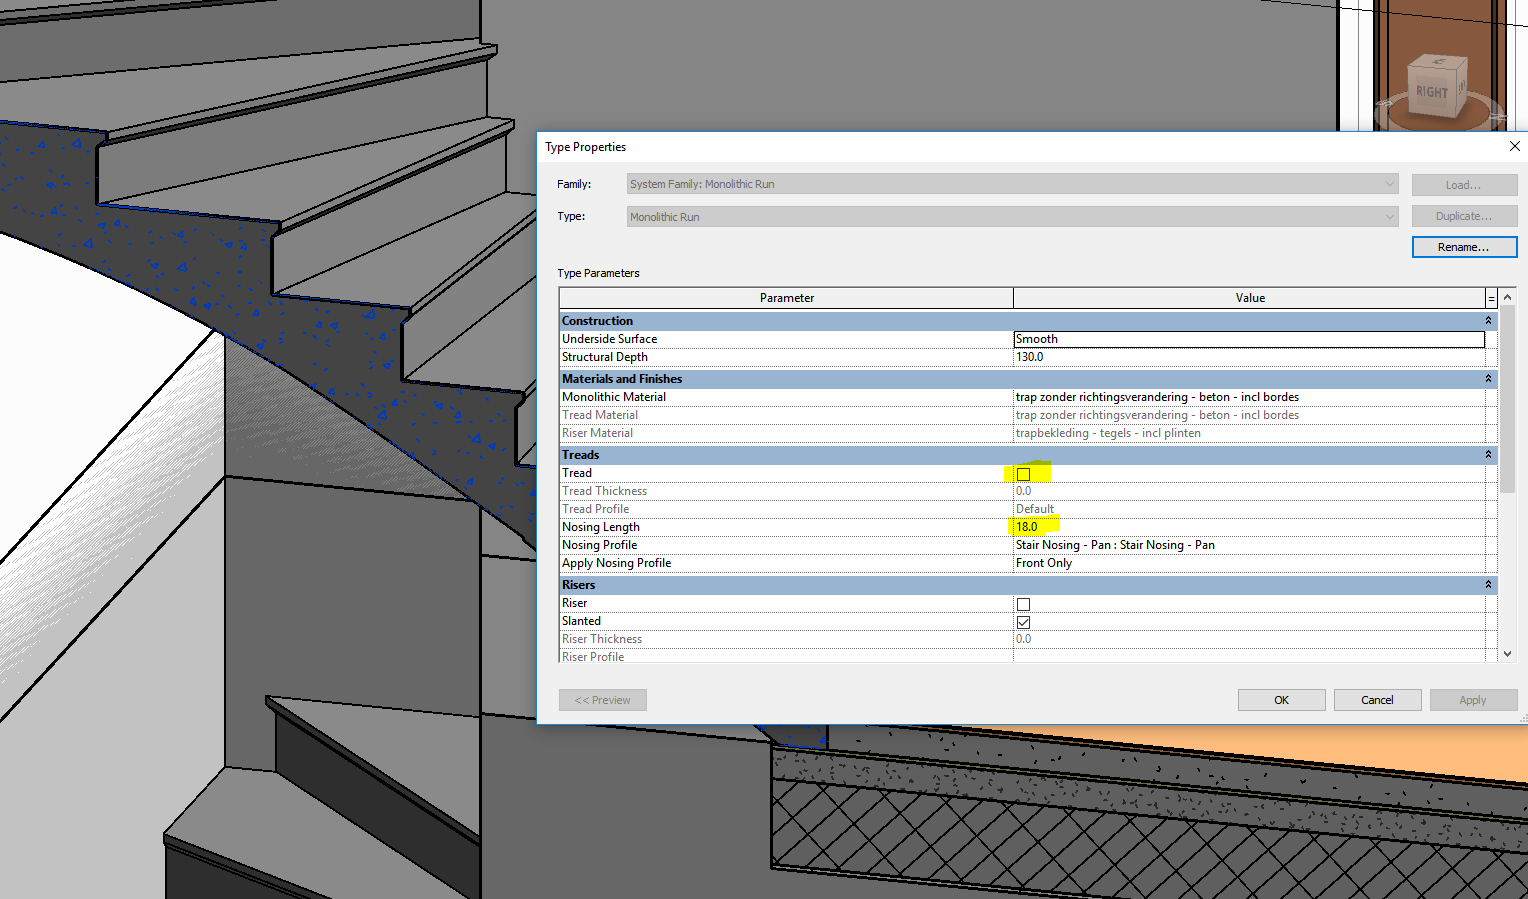
Just keep the Tread unchecked, apply Nosing Length (projection), set your custom Nosing Profile and you're done.
|
This user is offline |
|
|
|
active
Joined: Wed, Feb 12, 2014
0 Posts
No Rating |
Thanks a lot, now it worked :-). Next step will be to try to make a parametric profile
|
This user is offline |
|
|
|
active
Joined: Fri, Sep 3, 2010
0 Posts
|
I'm glad it worked. If you need assistance with the profile, just ask.
Good luck!
|
This user is offline |
|
|
|
active
Joined: Wed, Feb 12, 2014
0 Posts
No Rating |
I think I already can need assistance :-)
https://app.box.com/s/3lp0cwzyijcxhowdbbn0ghpae97kliki
In the link you can find a profile that I wanna use. there are 2 dimensions that I wanna keep the same with every stair. these are the vertical line at the left side(5cm) and I wanna a nose lenght from 3cm slanted no matter what riser height the stair have.
I worked somehow to create the profile not parametric so far. But for in projection I cannot add 3cm like I created the profile, I get an error that it's not possible to create this stair. But other values are possible, like 4cm. So in section I can see and measure I have a nose lenght 3cm and in plan view I measure then 4cm.
|
This user is offline |
|
|
|
active
Joined: Fri, Sep 3, 2010
0 Posts
|
The nosing doesn’t work because of the stair shape. A lot of winders and sharp angles are causing problems with some nosing length values. If revit cannot make it, there is a good chance that in real world it might not work either. Something to take a closer look at. Your profile works fine on the straight stair.
I’m a bit confused what exactly you’re after. It seems like your picture in the 1st post and your profile are different. I understand 30 and 50 dimensions, but what about the height? Are you trying to get the angled part to start in a fixed, certain distance from the top, as shown in your 1st post, or you want it to match the riser height, so it always starts from the tread below? What about the shape of the profile, is a simple triangular shape, as my sketch in post #2, no good?
|
This user is offline |
|
| |
|
|
active
Joined: Wed, Feb 12, 2014
0 Posts
No Rating |
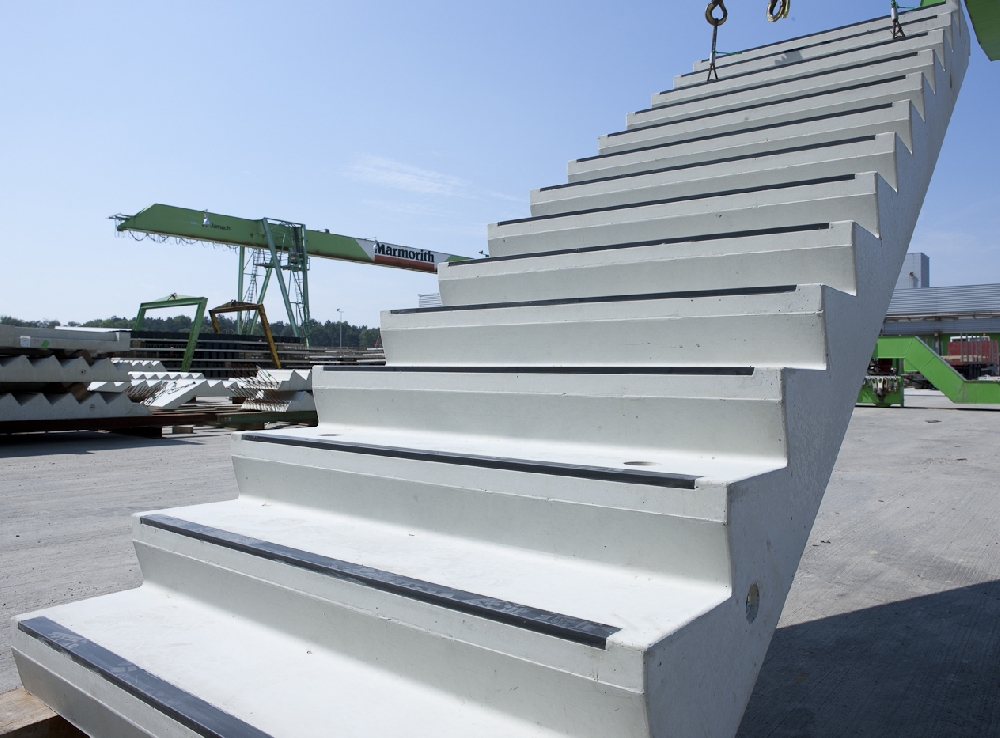
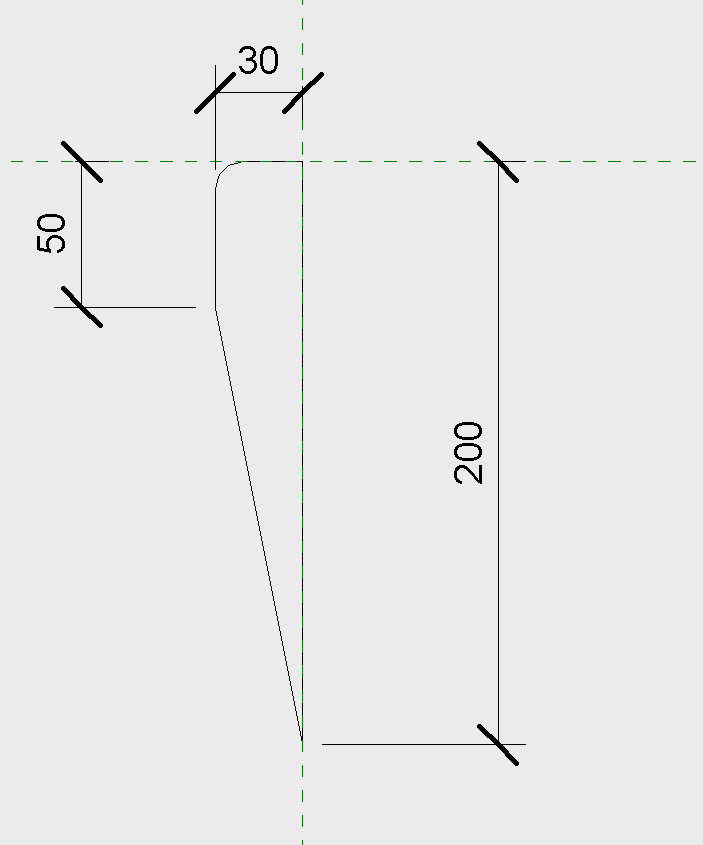
Ok, that makes more sense about the nose lenght, I will check the winders. Maybe was my first picture not the right one one with what I wanna achieve. I placed a picture from a precast stair with the shape I prefer.
The 30 and 50 dimension I would like to keep it always the same and let the angled part match the riser height.
If the black plastic part as on the picture also would be possible to add, that would be awesome too. But I would be already happy if I could let work the profile in a decent way.
|
This user is offline |
|
|
|
active
Joined: Fri, Sep 3, 2010
0 Posts
|
"
...and let the angled part match the riser height.
"
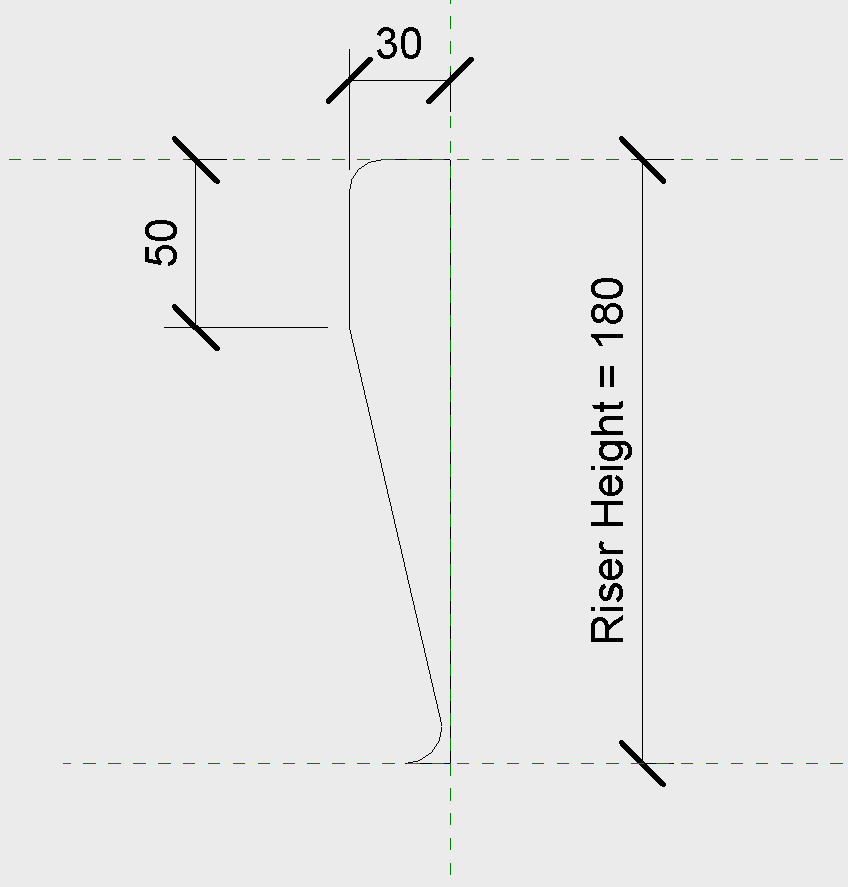
Automatically? While this is not totally impossible, but imho, it is impractical and cumbersome, difficult to coordinate and keep track of, especially if you have more than one stair in your project. Afaik, the only way to this is to utilize global parameter (cannot think of anything else at this moment) that would read the actual riser height in the project and report the value to the nosing/riser height parameter of the family. With only one or two stairs in the project, it might be worth a shot, but otherwise it can become a coordination nightmare very fast.
I would suggest making a nosing height a little bit more than required by the code (see pic1), so its bottom is always below the tread below, and take care of the dimensioning and correct shape of the stair in the detail view (section). Or, make the height of the nosing parametric (pic2) and manually apply its height depending on the actual riser height of the stair. That will require making multiple profile types - one for each stair.
If it comes to the non-slip strip, take a look at this.
|
This user is offline |
|
|
|
active
Joined: Wed, Feb 12, 2014
0 Posts
No Rating |
Thank you a lot. I tried your first profile that is a bit longer in height. I worked on the stairs first at the winders and then used the new profile without any errors this time :-). Now it seems it's all working great now.
For the non-slip part I tried to test it with creating a face based family. First a void extrusion and then a regular extrusion. Seems it work's too at first sight, now just adjust the dimensions. Just a negative part that you have to place it on each tread individually, however if it can work this way I'm already glad.
Thx anyway for the link. Revit has so much to offer but the learning proces can be difficult sometimes :-)
|
This user is offline |
|
|
|
Similar Threads |
|
PRECAST STAIR BEGIN WITH RISER LOOKS INCORRECT ON PLAN |
Revit Building >> Technical Support
|
Fri, Sep 2, 2016 at 7:03:03 AM
|
3
|
|
Precast stair with notch connection |
General Discussion >> Revit Project Management
|
Fri, Aug 26, 2016 at 1:05:15 AM
|
3
|
|
cantilevered stone stairs |
Revit Building >> Technical Support
|
Thu, Feb 22, 2018 at 2:30:39 PM
|
2
|
|
PRECAST STAIR STRINGER |
Revit Structure >> Technical Support
|
Mon, May 19, 2014 at 8:44:39 PM
|
2
|
|
Attaching railings to precast stairs [ 1 2 ] |
Revit Building >> Technical Support
|
Fri, Jan 16, 2015 at 6:37:53 PM
|
15
|
|
|
Site Stats
Members: | 2161655 | Objects: | 23325 | Forum Posts: | 152479 | Job Listings: | 3 |
|