|
Forums >> Revit Building >> Technical Support >> Revit Hatching
|
|
|
active
Joined: Fri, May 6, 2016
0 Posts
 |
I've been searching forums and have not found an adequate answer for my quandry:
I want to rotate some of the "Drafting" hatch patterns. Anyone know the code for the *.pat file to do this? I'm not interested in making them "model" patterns, as every forum I've read states, as I want them to scale along with the details.
As an example, pattern "Earth", in AutoCAD, is "standard" at a angle but our standard utilizes both angled and vertical/horizontal linework to differentiate topsoils vs. fills.
|
This user is offline |
|
 |
|
|
|
site moderator|||
Joined: Tue, May 16, 2006
13079 Posts
 |
I need to correct this thought "... I want them to scale along with the details...." Drafting patterns never scale. They are always the same scale relative to paper space and do not scale with the view scale. So are you sure this is what you want?
To 'rotate' a drafting pattern, you would have to rewrite the pattern file. This is not at easy task and taks someone really knowledgable or a program like hatchkit.
Making a drafting pattern a model pattern is a simple, one line of text alteration of the file.
|
This user is offline |
|
|
|
active
Joined: Fri, May 6, 2016
0 Posts
|
Technically drafting patterns do "scale" as they remain the same printed optic regardless of drawing scale. That is only accommodated by a changing scale based on the view scale. Model patterns do not scale as they remain unchanged no matter the view scale.
So, yes I'm sure that I want the hatch pattern to remain the same printed size regardless of the detail or view scale presented. This, to my knowledge, can only be accommodated with a "drafting" pattern. The "easy" of the model hatch is what I keep reading, but I'm having trouble figuring out how one actually makes that work in application. The hatch remains the same regardless of scale. So on small scale details it prints black, and large it's normal. Hardly functional at all. Or do people create the same hatch mutiple times for various scales and then be presented with the tedious task of matching the hatch scales with the drawing scales?
It's really quite sad that such a powerful program can be so inept at the simplest of documentation tasks. What project doesn't need detail hatching? It's been required on every single Architectural detail I've seen or created in my 16 years now...
|
This user is offline |
|
|
|
site moderator|||
Joined: Tue, May 16, 2006
13079 Posts
|
It takes people awhile to understand how much better Revit's hatches are because of model hatches.
Revit has a built in solution for drafting patterns when used with model elements like walls. That is described here in your HELP. This works well with detail views where these model elements are shown. Revit allows you to load multiple drafting and model patterns at different scales, you just have to give them unique names during the load. To do this, the pat file needs to be by itself and not in the standard combination file.
You specifically asked about the 'earth' pattern. I suggest you make this a model pattern to be able to rotate and you will only need a couple of sizes loaded. I also have my plywood pattern as model based but it is basically one size only and I only use it in larger detail views.
|
This user is offline |
|
|
|
active
Joined: Fri, May 6, 2016
0 Posts
|
Sorry about the multiple repeats. Didn't realize the refresh button does it.
I fully understand the difference between drafting and model hatching. Why they cannot be manipulated to any reasonable extent is baffling to me. It's counterproductive and restrictive. Again, the model hatching does not sound at all like my answer. When the details contains the actual model, sure, but the details I'm creating do not. They are "standards" and have no bearing on the physical model. Hence the need for Drafting hatches. And, as I previously stated, multiple versions of the same hatch is laughable at best. It's complicating things far more than need be. I guess it's just another reason Revit still hasn't proved to be truly better at Construction Document production work than AutoCAD. Still just a rendering program. I think I'll just be exporting the work I've done and finishing it in AutoCAD. smh
|
This user is offline |
|
|
|
site moderator|||
Joined: Tue, May 16, 2006
13079 Posts
|
You still don't understand a very important point. Model hatches do not have to be used in model elements. They can be used in detail elements and even drafting views. They are a very powerful tool if you learn to use them. They can exist with any family as well as project.
New Revit users always have problems just like OLD people. I know because I'm old and I used Autocad for over 25 years (started w/ 2.1), then I learned Revit and now I know I can do it better and faster in Revit then I could ever do it in CAD - and that includes simply drafting.
|
This user is offline |
|
|
|
active
Joined: Fri, May 6, 2016
0 Posts
|
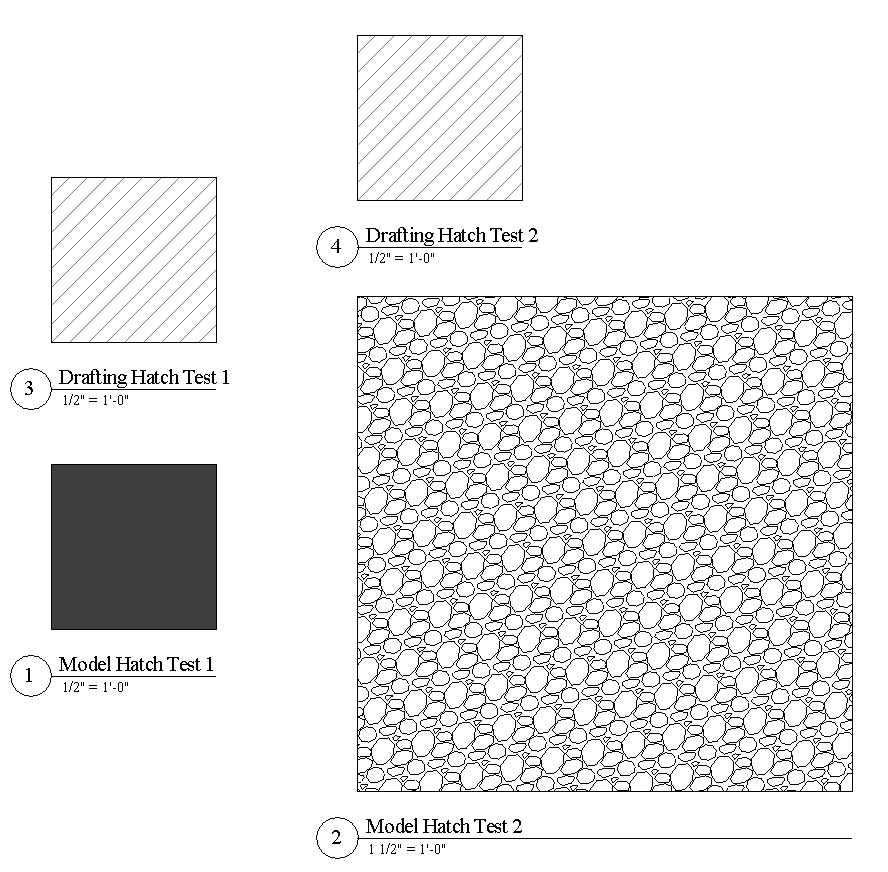
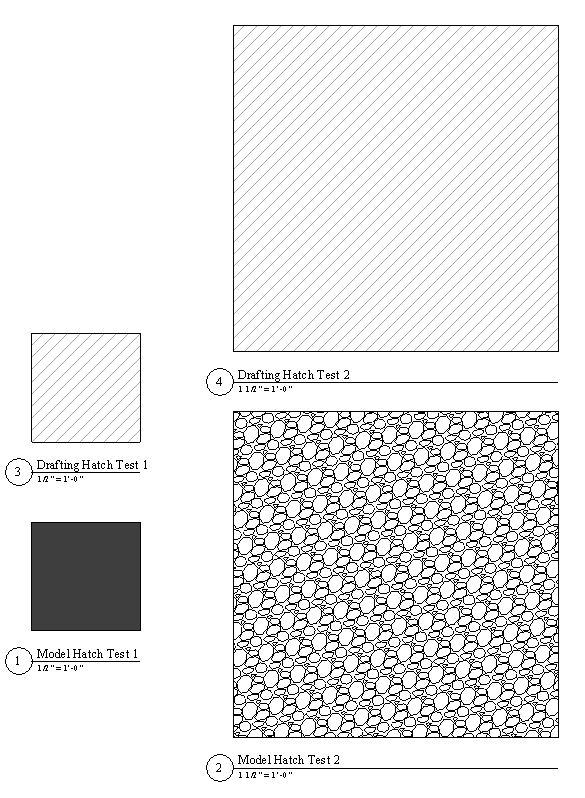
Your very important point is irrelevant to my post's inquiry. So I've attached a screen shot to clarify my intent. All boxes are 3'-0" square.
There are instances where we want the hatching to remain consistent (in the printed state) regardless of drawing scale. Is that not the definition of a "drafting" pattern? As you can see the Model Hatch fails miserably and is therefore completely unusable for the purposes of this post's inquiry. I made that clear in my first response. But, I'm guessing this is where you tell me I don't understand, am old, or some other troll-like insult and that the best way is that I'll have to create multiple versions of the same hatch to accommodate the various scales and orientations. To that I say Revit-0, AutoCAD-1...
|
This user is offline |
|
|
|
active
Joined: Fri, May 6, 2016
0 Posts
|
It would help if the attachment was correct...so here it is
|
This user is offline |
|
|
|
site moderator|||
Joined: Tue, May 16, 2006
13079 Posts
|
I fully understand your images but I don't have those problems because I will use the correct hatch for the application. I've tried to help you understand Revit in regards to what you want. I'm sorry that you are having problems here, perhaps you just need to stay with CAD.
|
This user is offline |
|
|
|
active
Joined: Fri, May 6, 2016
0 Posts
|
Based on your responses you don't have that problem because you, or your firm, has already spent countless hours developing multiple copies of model hatching to accommodate all scales, views, etc.. I'm not interested in wasting my time making up for the failure of the Autodesk programmers. I'll continue my hybrid approach utilizing the best parts of both programs. Maybe someday Autodesk will realize how dumb it all is and make a truly well-thought, intelligent and intuitive program.
That said, delete this post. It doesn't seem to contain much useful information anyways.
|
This user is offline |
|
|
|
|
|
active
Joined: Wed, Mar 2, 2011
106 Posts
 |
Use the "soil" pattern of autocad adding ";%TYPE=DRAFTING" under the name of the hatch in the descrition
|
This user is offline |
|
|
|
active
Joined: Tue, Jan 27, 2004
80 Posts
|
Yoou might find the fill rescaling and rotation capability provided within our free HatchKit Add-In for Revit handy to create a rescaled pattern on the fly without having to reload from a .PAT file.
You can obtain the add-in from the Revit Exchange or from our website.
-----------------------------------
Hugh Adamson
www.hatchkit.com.au |
This user is offline |
View Website
|
|
|