|
|
|
Home | Forums |
Downloads | Gallery |
News & Articles | Resources |
Jobs | FAQ |
| Join |
Welcome !
|
7 Users Online (5 Members):
Show Users Online
- Most ever was 626 - Mon, Jan 12, 2015 at 2:00:17 PM |
Forums
|
Forums >> Revit Building >> Technical Support >> Brick wrap around the top and sides of CMU wall
|
|
|
active
Joined: Tue, Jun 30, 2015
0 Posts
No Rating |
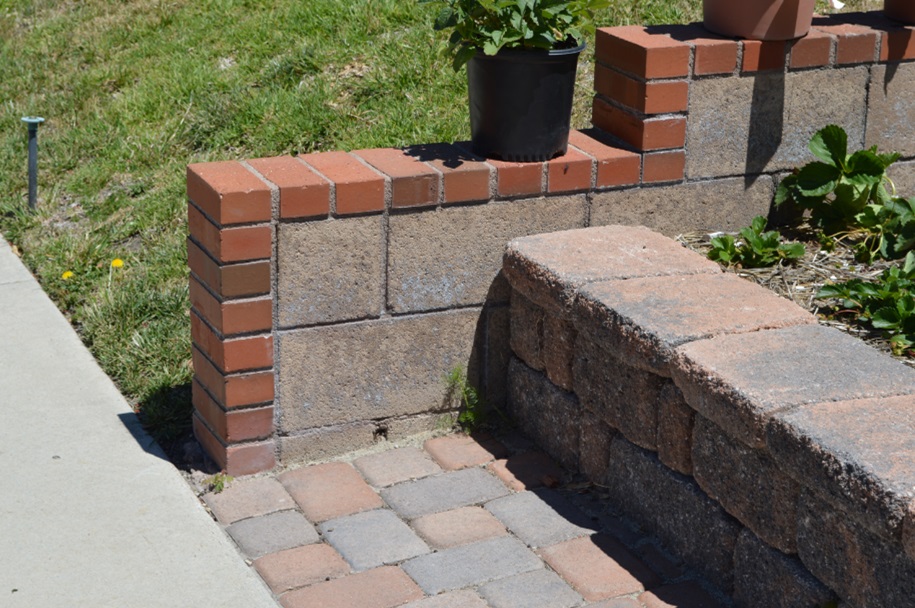
I am trying to model a stepped CMU wall with brick trim around the top and sides (see photo attached). I have edited the profile of the wall and made the steps but when I edit structure and add a sweep on top it only adds it to the top of the first step. the sweep then cuts thru the middle of the CMU steps behind the front step. and i have no idea how to add the brick to the side edges of the wall.
if any one can offer the best fastest way to model this i would be very appreciative.
thanks
Brian
|
This user is offline |
|
 | |
|
|
active
Joined: Tue, Jun 30, 2015
0 Posts
No Rating |
photos didnt seem to load
|
This user is offline |
|
|
|
site moderator|||
Joined: Tue, May 16, 2006
13079 Posts
 |
Try this method instead...
- Use a cornice
- For the wall end, you could split the face of the wall and paint the stacked brick material on the face then paint the different stacked brick on the end of the wall
- or you could do an in-place element with correct material
|
This user is offline |
|
|
|
active
Joined: Tue, Jun 30, 2015
0 Posts
No Rating |
can you send me some references im still learning revit. are there any links to a more detailed how to for generating the in place element?
thanks
|
This user is offline |
|
|
|
site moderator|||
Joined: Tue, May 16, 2006
13079 Posts
|
There are so many ways to do this and I think I have changed my mind.
You already have your running bond brick material. You will also need a stacked - sailor face material. Now simply split the wall face and paint the sailor material on the apprpriate faces.
If I have time later, I might be able to walk you trough it with some images.
|
This user is offline |
|
|
|
active
Joined: Tue, Jun 30, 2015
0 Posts
No Rating |
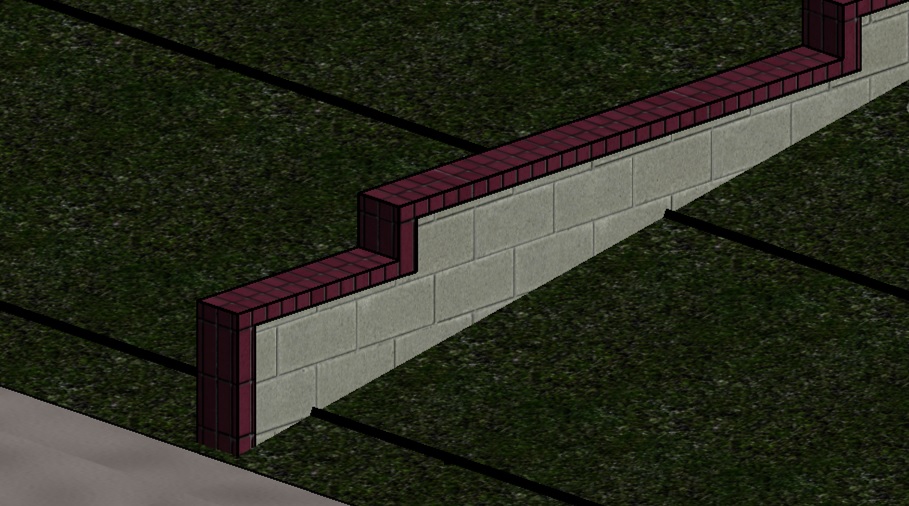
got it to work with split face and paint. but i still need to figure out how to copy the brick soldier material and align the picture better.
|
This user is offline |
|
|
|
active
Joined: Tue, Jun 30, 2015
0 Posts
No Rating |
any info on how to modify the brick soldier material to show a header pattern. this is where the brick is laid length wise and only the end is exposed in the wall face.
thanks
|
This user is offline |
|
|
|
site moderator|||
Joined: Tue, May 16, 2006
13079 Posts
|
You need two different materials. One for each face.
|
This user is offline |
|
|
|
Similar Threads |
|
brick cap at top of wall [ 1 2 ] |
Revit Building >> Technical Support
|
Sat, May 7, 2016 at 3:13:55 PM
|
16
|
|
wall closure wrapping at doors, curtain walls |
Revit Building >> Technical Support
|
Fri, Apr 15, 2011 at 10:50:26 AM
|
6
|
|
CMU + brick wall- brick is NOT bearing |
Revit Structure >> Technical Support
|
Tue, Dec 22, 2009 at 3:16:30 PM
|
3
|
|
Hello Newbie here, brick on brick on cmu wall type doesn't show up |
Community >> Newbies
|
Thu, Jan 27, 2011 at 1:06:15 PM
|
1
|
|
Wall type wrap |
Revit Building >> Technical Support
|
Thu, Nov 26, 2009 at 3:25:40 PM
|
8
|
|
|
Site Stats
Members: | 2161655 | Objects: | 23325 | Forum Posts: | 152479 | Job Listings: | 3 |
|