|
|
|
Home | Forums |
Downloads | Gallery |
News & Articles | Resources |
Jobs | FAQ |
| Join |
Welcome !
|
6 Users Online (4 Members):
Show Users Online
- Most ever was 626 - Mon, Jan 12, 2015 at 2:00:17 PM |
Forums
|
Forums >> Revit Building >> Technical Support >> create-parts and multi-layered roofs with shape edits
|
|
|
active
Joined: Tue, May 21, 2013
0 Posts
No Rating |
hello all,
I have a flat roof that has variable rigid insulation slopes in order to drain water at various points within its perimeter.
in the same assembly there is also a 1/2" plywood sheating base below the sloping insulation.
I would like to break that into parts, but after reading various web posts and trying it, it seems that roof shape editing
of a variable height layer (my sloping insulation), automaticly "kills" the create parts button.....and vice-versa....if I create
parts for a flat roof version, and even try to activate shape editing, revit will delete the parts......ugh
anyway around all this?....where I can have both parts and sloping insulation in a multi-layered roof?....or do I have to
just keep the layers as separate elements?
thanks
PS: using revit arch 2016
Edited on: Sat, Feb 20, 2016 at 11:09:24 PM
|
This user is offline |
|
 | |
|
|
active

Joined: Mon, Nov 19, 2007
93 Posts
 |
The roof tool is good to make standard roofs but when it gets a little complicated its limitations can prevent you from achieving what you need.
In these circumstance what I have done is simply use an in-place family. I create a horizontal extrusion across the distance it spans, I make the profile of that extrusion a number of layers in accordance with buildup of the specific roof. I then use a vertical void to trim the extrusion to the boundary it must follow. This is then repeated for the rest of the roof. A mono-pitch/skillion roof is easy as it is a single extrusion and a pitched ridge roof can be done too.
Using an in-place family in this instance creates a solid that is sculpted to the exact spatial needs of the roof, allowing you to add in flat roof mounted elements such as roof plant at the correct height and design the edge condition such as a parapet or eave where the roof perimeter line runs. You can't extract out the names of all roof buildup materials (not without a lot of effort) but for plans, detailing, sections and elevations it is the perfect.
-----------------------------------
__________I'm the guy they come to when they didn't follow my recommended workflows.__________ |
This user is offline |
|
|
|
active
Joined: Tue, May 21, 2013
0 Posts
No Rating |
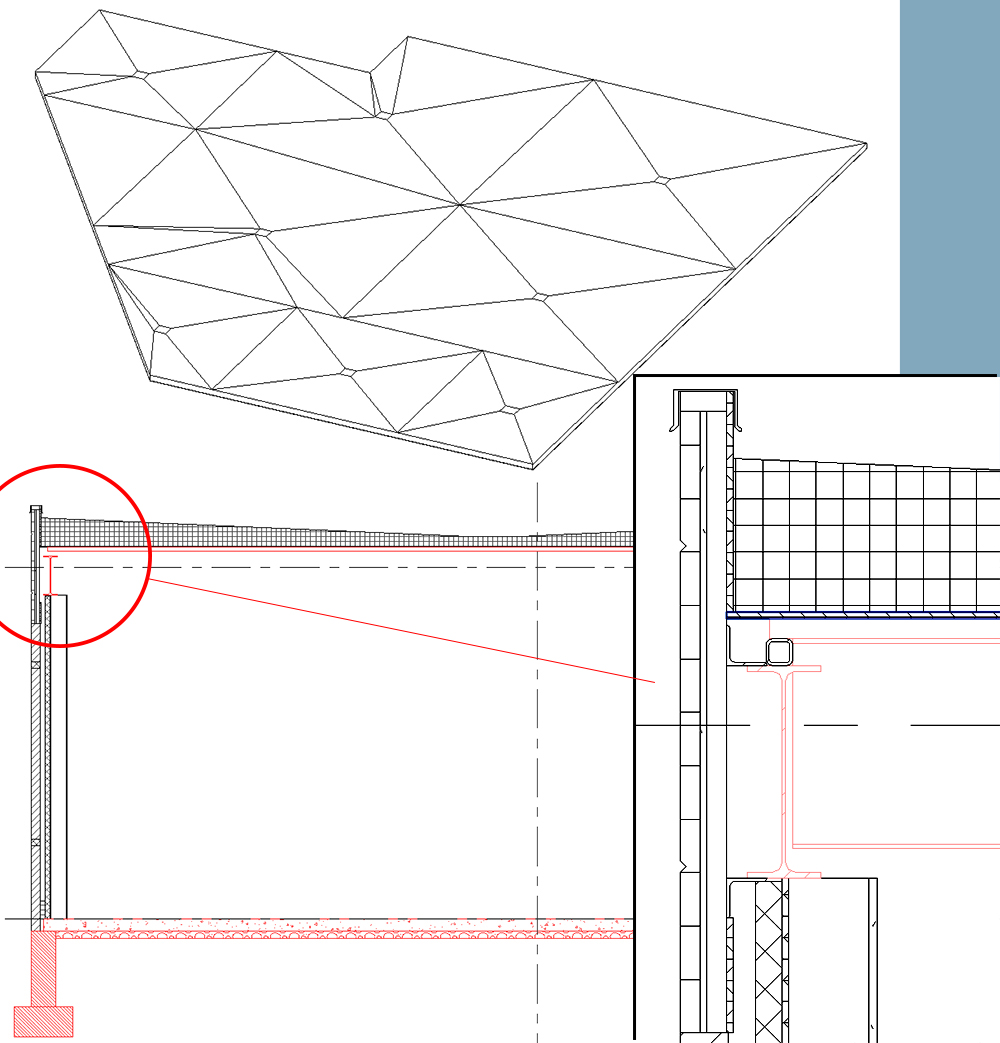
not sure I can achieve what u mention in my case w/ just a in-place fam....esp. all the drainage slopes I need
here's a 3d bird's eye view, and a section cutting through a small part of the roof.....it's slopped insulation over 1/2"
sheating, over metal deck, the overall assembly.....the metal deck and rest of structural is in its own structure file (red)
while the sheating and slopped ins. is in the arch file....at this point I just ended up having the sheating separate
from the slopped insulation, because at time the sheeting needs to end closer to the wall elements then the insulation.
anyway here's an image....it's still a work in progress...
|
This user is offline |
|
|
|
active
Joined: Mon, Nov 19, 2007
93 Posts
|
Just use a floor slab. Set the right thickness to suit your required roof buildup. Set the floor slab plan profile to the correct footprint shape. Then select the floor slap and adjust the spot heights all across it to suit your calculated falls.
Here's a youtube video to explain adjusting spot heights.
https://www.youtube.com/watch?v=cbudDb31Vzk
Cut out holes for drainage gulleys and add in family category objects as required.
-----------------------------------
__________I'm the guy they come to when they didn't follow my recommended workflows.__________ |
This user is offline |
|
|
|
Similar Threads |
|
Multi-Layered Sliding Curtain Wall With Glass + Fabric Curtains |
Revit Building >> Technical Support
|
Mon, Jan 4, 2016 at 9:41:21 AM
|
2
|
|
Parts shape handles Revit 2012 |
Revit Building >> Technical Support
|
Wed, May 9, 2012 at 2:00:55 PM
|
6
|
|
Parts Shape Handles |
Revit Building >> Technical Support
|
Tue, May 19, 2015 at 12:03:06 PM
|
3
|
|
Multi planar Rebar shape |
Revit Structure >> Technical Support
|
Wed, Jun 12, 2013 at 4:43:44 AM
|
4
|
|
Foundation Wall with Brick shelf (Layered) |
Revit Building >> Technical Support
|
Fri, Jul 29, 2011 at 11:33:00 AM
|
1
|
|
|
Site Stats
Members: | 2161655 | Objects: | 23325 | Forum Posts: | 152479 | Job Listings: | 3 |
|