|
Forums >> Revit Building >> Technical Support >> Insulation layer wrapping the wall
|
|
|
active
Joined: Sun, Mar 11, 2012
25 Posts
 |
Good afternoon all!
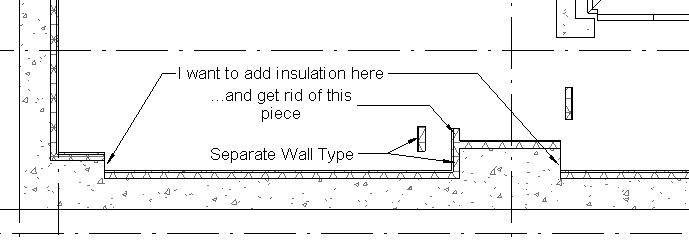
Does anyone have created two walls with rigid insulation which wraps them in a plan view smoothly?
(Structure/ Wrap toggle does not help). Adding a separate wall does not work as well: when I disallow join, it is not what I want. When I allow join, it joins the concrete wall and “sinks” in it. Is there a predefined way to do this in Revit 2014?
Please share your experience.
Thank you.
|
This user is offline |
|
 |
|
|
|
active

Joined: Fri, Sep 3, 2010
0 Posts
 |
Create your perimeter insulation wall some distance away from the concrete wall, trim the corners (if needed) then use align tool to move the insulation wall in its place where you want it.
When you model a furring wall aligned/touching another wall, furring wall doesn’t want to trim corners nicely.
|
This user is offline |
|
|
|
active

Joined: Tue, Aug 25, 2009
0 Posts
|
i could not find a way to make those wraps. i would either do infill pieces or do the interior wall as a secondary wall everywhere.
|
This user is offline |
View Website
|
|
|
active
Joined: Sun, Mar 11, 2012
25 Posts
|
Thank you for the advice. Now I seee that there is no "official" way to do it. I tried what you describe, but the wall, when I align it to the right place, merges with the concrete wall and disappears inside it.
|
This user is offline |
|
|
|
active
Joined: Tue, Aug 25, 2009
0 Posts
|
after playing with this some, i think it is because you are changing wall thickness.
using that specific condition, i am also having problems.
when we do a simple corner turn, we do not have this issue.
perhaps the wall should be modeled differently. Is it a column at a foundation wall?
Not sure what to tell you.
|
This user is offline |
View Website
|
|
|
active
Joined: Fri, Sep 3, 2010
0 Posts
|
I always model furring walls as a separate wall. Take a look at this video: http://www.screencast.com/t/t2dtWuSqU1ds
Is this what you're looking for?
|
This user is offline |
|
|
|
active
Joined: Tue, Aug 25, 2009
0 Posts
|
i noted a difference in the way the two of you handle your wall.
in the original post, i took it that the thicker wall was a single wall. in your screencast, the wall was a secondary wall aplied to make it thicker.
if you use a single wall (thicker) it will fail as we were discussing.
|
This user is offline |
View Website
|
|
|
active
Joined: Sun, Mar 11, 2012
25 Posts
|
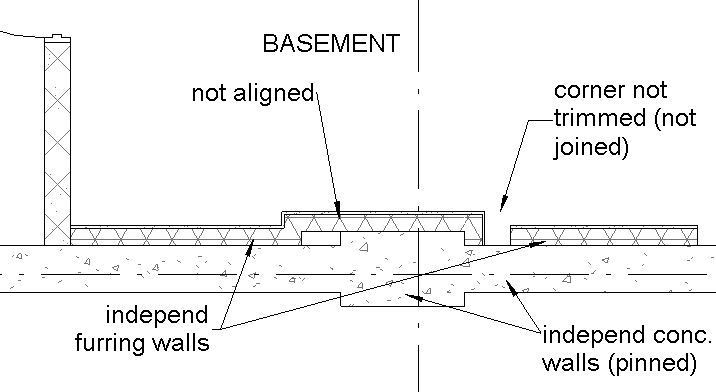
You way is much better for these walls couldhave different phases, what is very important in many practices. I used both ways (in my sketch you see both approaches), and both failed. This video shows exactly what I want to have.
But I could not succeed in this operation from the beginning. What I am doing wrong?
Thank you for the video and for the advice. They inspired me.
|
This user is offline |
|
|
|
active
Joined: Sun, Mar 11, 2012
25 Posts
|
Yes, I thought it might be related to the thickness of the conc. wall. I made it thicker and wider - partly it works, but the two side thin conc. walls cannot extend to the thick one and not join it. The best thing I reached is not joined connestion (I disallowed join of thin walls), but it does not work with the project dimensions.
|
This user is offline |
|
|
|
active
Joined: Fri, Sep 3, 2010
0 Posts
|
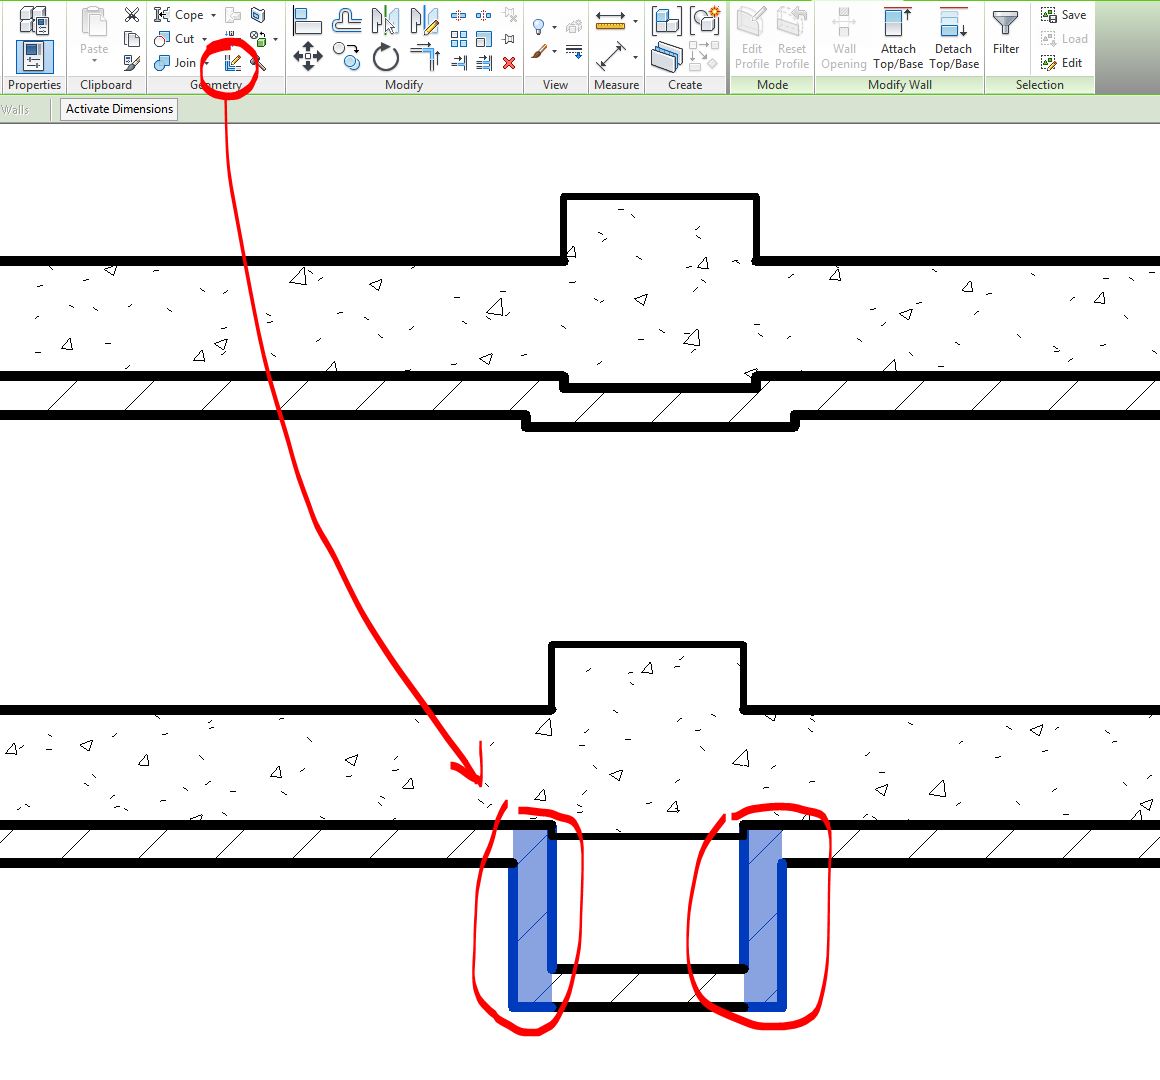
Ok, this is a little bit different than your original picture. Revit doesn’t like this condition (very short walls) too much, but you can try using Wall Joins tool and maximize the length of those short walls – see pic.
|
This user is offline |
|
|
|
|
|
active
Joined: Sun, Mar 11, 2012
25 Posts
|
I've got it!
First, disallowed join of all the concrete walls, then placed the furring walls at the desired place (they were joined and looked nice), then dragged the thin conc. walls to the tick walls (they were still not joined), worked a little on somethhing else (it also might be a factor in such a wierd process), then went back to these walls and joined them with the Join tool.
But on he video it is much more simple!
Thank you all for help!
|
This user is offline |
|
|
|
active
Joined: Sun, Mar 11, 2012
25 Posts
|
Thank you for pointing me at the Wall Joints tool. It is always the last resort.
But I wish to be able to do it as nicely and simply as it is on the video.
|
This user is offline |
|
|
|
active
Joined: Tue, Aug 25, 2009
0 Posts
|
I think this comes down to the way the walls were created. I noticed in the screencast that was previously created that it looked like two walls were put together to make the column bump out...
Check out the video i threw together for you. it depicts how the walls are created can impact the interior wrap.
https://screencast.autodesk.com/Main/Details/359427f2-8efd-4ef2-8f69-126dd5d78a33
Edited on: Thu, Sep 4, 2014 at 7:49:04 AM
|
This user is offline |
View Website
|
|
|
active
Joined: Fri, Sep 3, 2010
0 Posts
|
Interesting, …I’ve never run into that before. My example shows structural column and continuous concrete wall running through the column. Nice find Blue.
|
This user is offline |
|
|
|
active
Joined: Sun, Mar 11, 2012
25 Posts
|
Very interesting!
|
This user is offline |
|
|
|