|
|
|
Home | Forums |
Downloads | Gallery |
News & Articles | Resources |
Jobs | FAQ |
| Join |
Welcome !
|
7 Users Online (5 Members):
Show Users Online
- Most ever was 626 - Mon, Jan 12, 2015 at 2:00:17 PM |
Forums
|
Forums >> Revit Building >> Technical Support >> Creating custom material from raster image in Revit 2013
|
|
|
active
Joined: Tue, Oct 11, 2011
19 Posts
No Rating |
Hello! I have been scouring the internet for about an hour and a half now and can't seem to find a direct answer to my question.
I am trying to prep my model to do some final renderings and cannot for the life of me figure out how to get a raster image of a material texture that I edited in photoshop (which happens to be cedar siding) into my materials library. I have done it many times in Revit 2012 with relative ease if my memory serves me. But 2013 has me completely baffled. If anyone can share a link to a thread that answers this question or if anyone knows how to do this I would greatly appreciate it.
Thanks in advence!
|
This user is offline |
View Website
|
 | |
|
|
active

Joined: Mon, Mar 15, 2010
199 Posts
 |
material in Revit 2013 sucks!!
it's possible but too complecated and confusing..
in Revit 2014, the material feature went back like Revit 2012
just use 2014(or 2012)
-----------------------------------
want more?
You can get more tips at Enjoy Revit |
This user is offline |
View Website
|
|
|
active

Joined: Tue, Jan 16, 2007
1009 Posts
|
does your material have the asset for "appearance" in the material editor?
|
This user is offline |
View Website
|
|
|
active
Joined: Tue, Oct 11, 2011
19 Posts
No Rating |
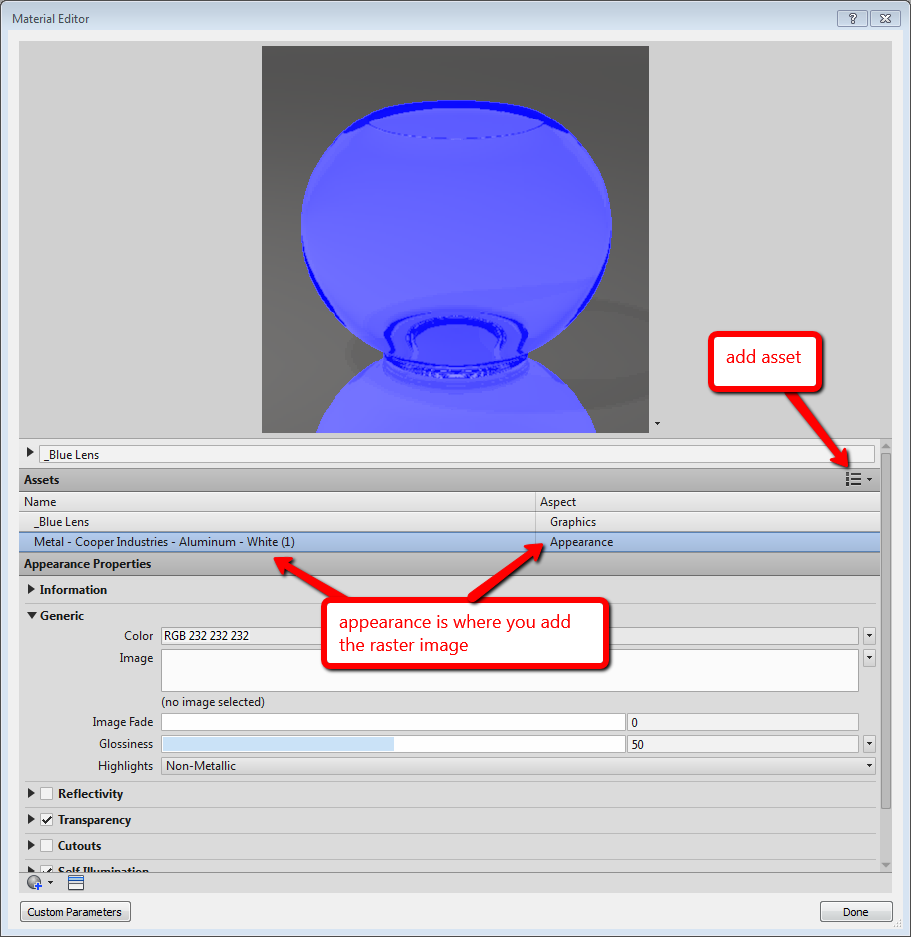
Thanks! So this is how I ended up doing it. Duplicate a material that already has a raster image associated with it. Click on "Appearance" as shown in the image above. Click on the .png file name under the thumbnail image and select the custom .png file that you saved to the following location:
C:> Program Files (x86) > Common Files > Autodesk Shared > Materials > Textures > 3 > Mats
I'm not sure this will be the file location for everyone but you can quickly figure out what it is by clicking on the .png file under the thumbnail image and it will take you to the destination folder.
One note: I was not able to save the .png image to the destination folder directly from Photoshop. I had to save it to the Desktop first and copy it into the desination folder. It will tell you that you need permission from an Administrator but I just clicked "Continue" and it copied just fine.
Hope this helps anyone who might have this problem in the future!
|
This user is offline |
View Website
|
|
|
active
Joined: Sun, Jan 5, 2014
0 Posts
No Rating |
In Revit 14
First select a plain material like : Laminate Ivory Matte.
Then under appearance select image....browse your image...adjust the required sample size
and apply
|
This user is offline |
|
|
|
Similar Threads |
|
Material Creation |
Revit Building >> Technical Support
|
Sun, Apr 26, 2009 at 12:08:51 PM
|
4
|
|
Creating a new material from scratch in Revit 2013 |
Revit Building >> Technical Support
|
Wed, Jun 12, 2013 at 11:31:32 AM
|
5
|
|
Raster Image display |
Revit Building >> Technical Support
|
Fri, Oct 10, 2008 at 6:08:26 AM
|
5
|
|
Revit 2013 Material Creation |
General Discussion >> Revit Project Management
|
Fri, Mar 15, 2013 at 3:35:40 PM
|
2
|
|
Glass Material with Custom Image Overlay |
Community >> Newbies
|
Sat, Feb 19, 2011 at 3:00:15 AM
|
1
|
|
|
Site Stats
Members: | 2161655 | Objects: | 23325 | Forum Posts: | 152479 | Job Listings: | 3 |
|