Forums
|
Forums >> Revit Building >> Technical Support >> wall infills
|
|
|
active
Joined: Wed, May 16, 2007
21 Posts
No Rating |
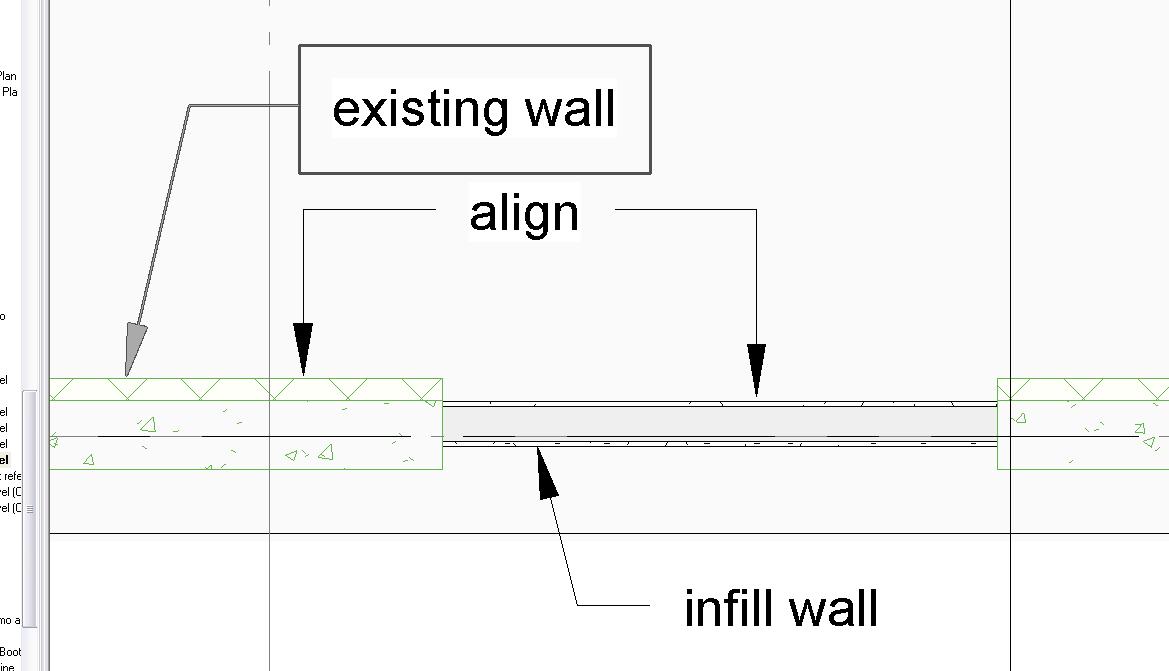
I have a problem with wall infills. When a door gets demolished Revit automatically creates a wall infill. It is possible to change that wall infill to a different wall type, but so far I haven't been able to figure out how to manipulate the placement of that wall infill within the existing wall. Please refer to the attachment to see what I'm trying to accomplish. Somebody suggested to create an opening where the wall infill is and then place a new wall within the infill. This approach sort of works but it is not perfect. For this to work the new wall needs to be a little bit smaller than the actual opening size. Thanks,Terealva
|
This user is offline |
|
 | |
|
|
site moderator|||
Joined: Tue, May 16, 2006
13079 Posts
 |
The person that told you to cut the wall and insert something new was right and the wall does not neet to be any smaller than the opening.
|
This user is offline |
|
|
|
active
Joined: Wed, May 16, 2007
21 Posts
No Rating |
When I place the opening exactly in line with the wall infill I get an error message saying that the host will get deleted. This is because once you create the opening of the same size of the wall infill you are basically deleting the wall, therefore the opening can't exist. So, the opening has to be a litte bit smaller than the wall infill. Thanks, Terealva.
|
This user is offline |
|
|
|
site moderator|||
Joined: Tue, May 16, 2006
13079 Posts
|
DON'T JOIN THE WALLS... BLUE DOT EACH END OF NEW WALL.
|
This user is offline |
|
|
|
active
Joined: Tue, Feb 8, 2011
2 Posts
No Rating |
Here's a method I am using and I like it.
I have an existing wall with an existing window. I demo the window, revit creates an infill. The infill graphically displays as existing, and doesn't show the detail of the infill wall, even if I change the wall properties to a different wall type with layers of detail in it. To me, that is unacceptable since I want a new fire rated partiton and I want it to appear with all the layers. Solution: Hide the infill wall (hide elements) and redraw the new wall type over the top. It isn't perfect, but you don't have to draw a cumbersome wall opening... If you don't want anything there at all, just hide the infill element and don't draw anything new - the existing wall lines wrap the edges and looks good
|
This user is offline |
|
|
|
site moderator|||
Joined: Tue, May 16, 2006
13079 Posts
|
If you demo in new phase, the infill will show properly.
|
This user is offline |
|
|
|
active
Joined: Tue, Feb 8, 2011
2 Posts
No Rating |
Yes - But then the existing wall will read as new, which defeats the purpose.
|
This user is offline |
|
|
|
active
Joined: Tue, Nov 3, 2009
4 Posts
No Rating |
maybe it was an all rigt work-around for one opening, but I have a project with hundreds of doors demolished an I need the infilling wall to align one face of the existing wall, but the infilling wall just keeps aligning itself to center. I get the message 'Infilling element was automatically moved to keep it aligned to host.' But I don't want it to do it!! I tried unjoin geometry, but it has no effect. There must be a way of defining an infilling element without cheating around with an extra new wall.
Anybody, help
|
This user is offline |
|
|
|
active
Joined: Tue, Nov 3, 2009
4 Posts
No Rating |
Ok, this is funny. I've found a way to do it by accident. I tried to define in properties of infilling wall Location line: Finish face, interior, apply - but nothing happend - infilling wall stayed in centre. And then when you move this infilling wall, no matter how much or which direction, it aligns itself to what defined in properties. So yes, I have o move a bit all this hundreds infilling walls, but still the best way of doing it so far.
|
This user is offline |
|
|
|
Similar Threads |
|
Wall Infills |
Revit Building >> Technical Support
|
Wed, Apr 9, 2008 at 1:12:51 PM
|
3
|
|
Setting wall to demolition, infills - how to stop? |
Revit Building >> Technical Support
|
Fri, Aug 5, 2016 at 11:24:18 AM
|
2
|
|
Wall infills for plans (presentation purposes) |
Revit Building >> Technical Support
|
Tue, Aug 25, 2009 at 8:17:22 AM
|
6
|
|
How to create recessed infills above windows on brick veneer? |
Revit Building >> Technical Support
|
Wed, Jul 11, 2018 at 1:14:42 AM
|
1
|
|
Wall and Instance phasing warning - Incorrectly Reporting? |
Revit Building >> Technical Support
|
Thu, Oct 11, 2018 at 3:37:00 PM
|
4
|
|
|
Site Stats
Members: | 2161655 | Objects: | 23325 | Forum Posts: | 152479 | Job Listings: | 3 |
|