Forums
|
Forums >> Revit Structure >> Technical Support >> Wall and floor joints
|
|
|
active
Joined: Tue, Sep 23, 2008
42 Posts
No Rating |
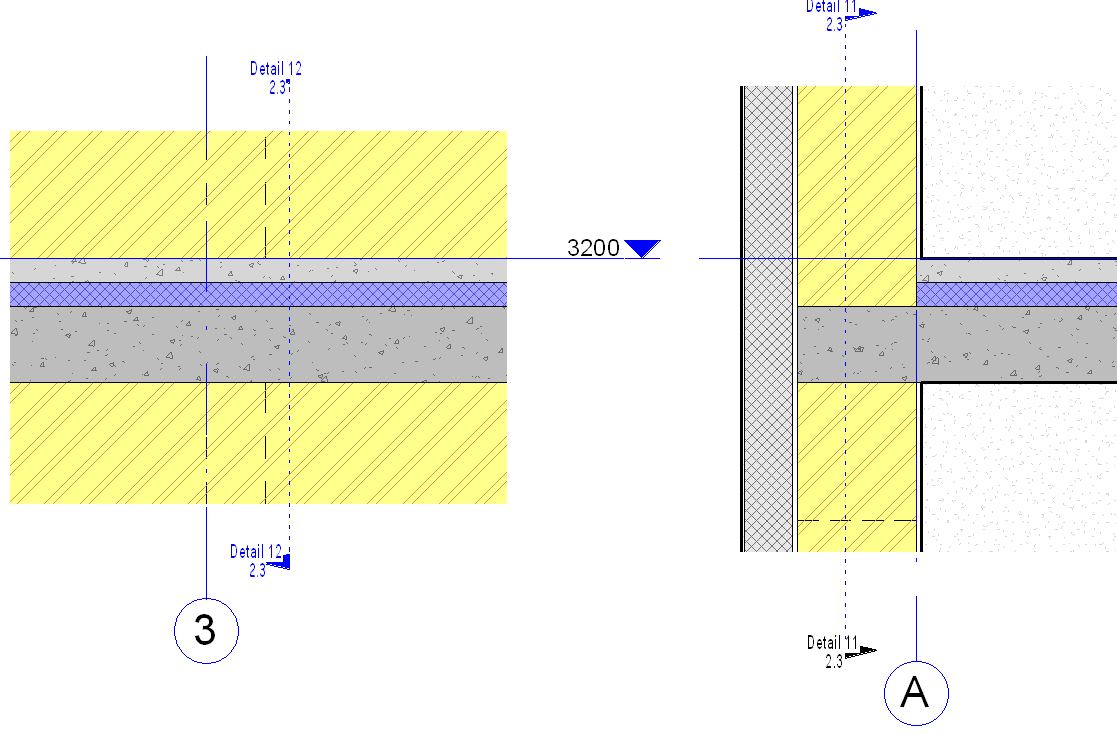
Hello! I posted this thread in "Revit Building" chapter, but actually I have this problem in "Revit Structure"! Sorry.. So, while creating detailed drafts I discovered a problem that I don't know how can be resolved. I attached a picture, where it is possible to see, that section named "Detail 11" isn't shown properly, because layer with insulation and another layer with concrete don't go as far where section is made. How do you guys deal with such situations, is it possible to make the section show things right?
|
This user is offline |
|
 | |
|
|
site moderator|||

Joined: Tue, May 22, 2007
5921 Posts
 |
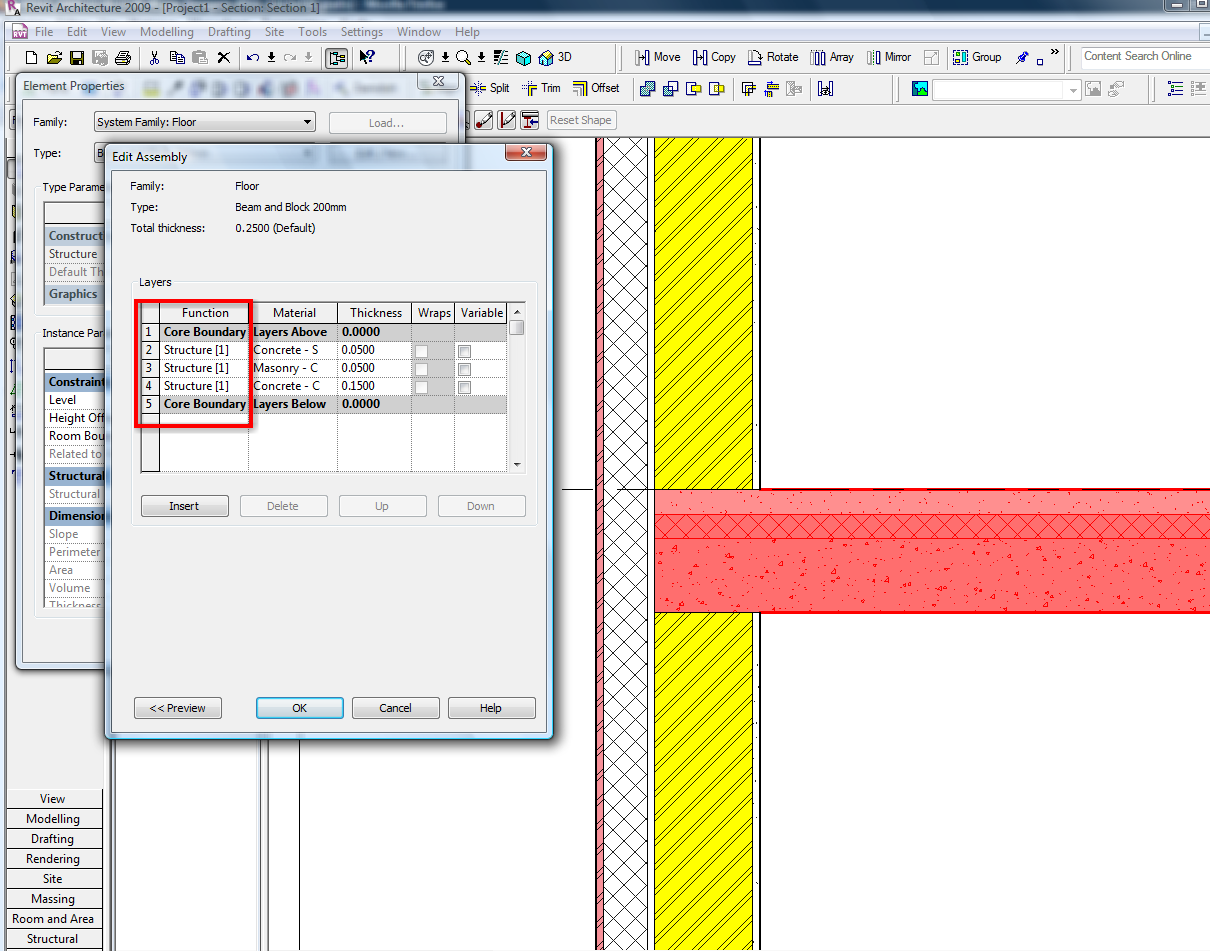
Hi, you must change the "Function" and put them like in the image attached, also you must check where is the core of the wall...
-----------------------------------
I Hope and I Wish to LEARN more, and more, and more.... REVIT |
This user is offline |
|
|
|
active
Joined: Tue, Sep 23, 2008
42 Posts
No Rating |
Please see my images again.. The second part of image is right, you see.. so the functions are set right... But when creating a section in 2nd part of image, you can see that detail is not displayed right. Did you understand what I'm talking about, or shall I explain more!?
|
This user is offline |
|
|
|
active
Joined: Tue, Sep 23, 2008
42 Posts
No Rating |
The image you posted is wrong from engineering site, because insulation layer and concrete layer above ends when the supporting wall starts, see my second image that is right. But when section is made in the second image, you must not see these 2 layers above, but revit shows them... You understand?
|
This user is offline |
|
|
|
site moderator|||
Joined: Tue, May 16, 2006
13079 Posts
 |
Check out this item in your help, it will help explain how to control these issues: Applying a Function to a Layer of a Compound Structure
|
This user is offline |
|
|
|
active
Joined: Tue, Sep 23, 2008
42 Posts
No Rating |
Thanks, do you understood than one view is shown right but another is wrong?
|
This user is offline |
|
|
|
active
Joined: Tue, Sep 23, 2008
42 Posts
No Rating |
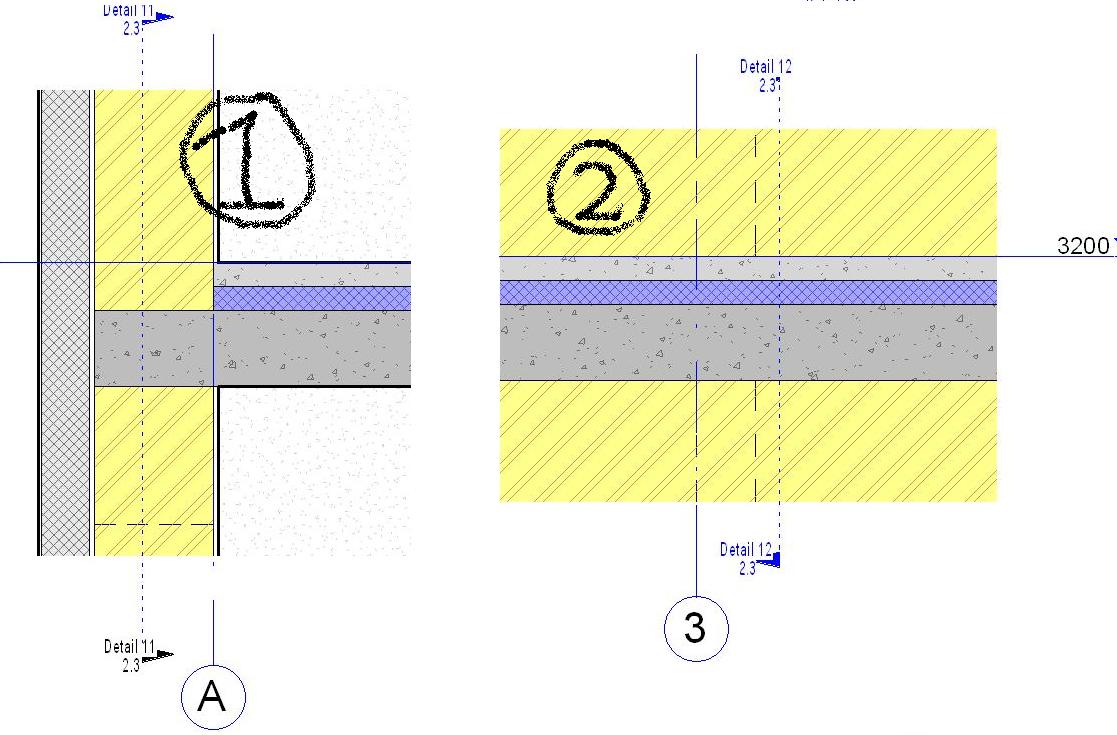
I took a look at help, and I have seen this page 50 times, i even have a paper printed out so I woul remember that wool materials go to [3] layer. I'll explain once more... In the first picture I attached now you can see that the floor is joined to the wall. Also you can see, that the 2 layers abow dont go into the wall. This detail is right, and concrete will be pored in real life as shown in the picture.. This image is right, so the priprities of layers also are set RIGHT... Now when creating section named "Detail 11" placed inside the wall where only the lower layer of concrete divides this wall into two parts, you have image Nr.2. When you look at this image, you also see insulation and the top layer, but how come you see them it if you dont cut them? Even if the "Far clip offset" is set to 1mm. Do you undestand?
|
This user is offline |
|
|
|
site moderator|||
Joined: Tue, May 22, 2007
5921 Posts
|
So, the first image (left) you have it's WRONG? the second (right) it's OK? this is right? and what do you want is in the left image only appear the 3 "Layer" , the concrete in bottom right??? ok if it is i think you can create a "Filled Region" with the pattern of the wall (yellow)... OK now you change the images, i'm talking about the FIRST images you post ABOVE in the first post...
Edited on: Tue, Dec 30, 2008 at 9:54:27 AM
-----------------------------------
I Hope and I Wish to LEARN more, and more, and more.... REVIT |
This user is offline |
|
|
|
active
Joined: Tue, Sep 23, 2008
42 Posts
No Rating |
I see you understood, that revit is not showing it right! I was hoping to get the view right without hatching. Yes, i changed the images..
|
This user is offline |
|
|
|
active
Joined: Tue, Sep 23, 2008
42 Posts
No Rating |
I wanted to add, that it is not my wish not to see the 2 layers above, this is how it should be when looking at the picture with Nr.1 and imagining how the section view would look if section would be made through the wall.. right!?
|
This user is offline |
|
| |
|
|
site moderator|||
Joined: Tue, May 16, 2006
13079 Posts
|
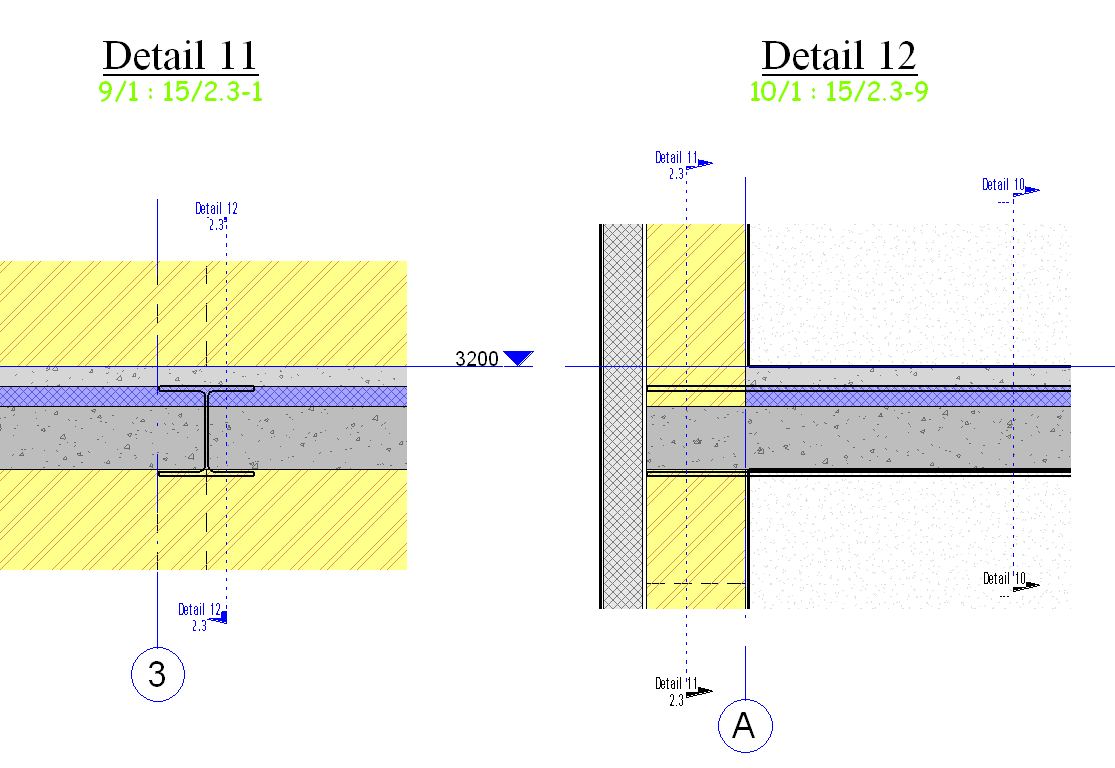
I agree, REVIT does appear to show it wrong. However, this is a really strange view that most people would not cut. Looks like if you have to have this view, you will have to edit it.
|
This user is offline |
|
|
|
active
Joined: Tue, Sep 23, 2008
42 Posts
No Rating |
Thank you WWHub for admiting that revit shows wrong, because I bagan to thing that I'm not understanding the spatial solution. I have support of the beam there, that I want to detail, so this is the reason why I'm cutting there (see the attachment)
|
This user is offline |
|
|
|
site moderator|||
Joined: Tue, May 16, 2006
13079 Posts
|
I would just turn off the floor and add the hatch for the concrete only rather than trying to get rid of what you don't want.
|
This user is offline |
|
|
|
active
Joined: Tue, Sep 23, 2008
42 Posts
No Rating |
Right.. =)
|
This user is offline |
|
|
|
Similar Threads |
|
Floor+beam and wall joints |
General Discussion >> Revit Project Management
|
Wed, May 12, 2010 at 10:46:56 PM
|
0
|
|
vertical joints in hosted wall sweep? |
Revit Building >> Technical Support
|
Mon, Aug 13, 2007 at 3:37:15 PM
|
0
|
|
Cutouts in wall and floor joints |
Revit Structure >> Technical Support
|
Tue, Dec 30, 2008 at 11:46:31 AM
|
2
|
|
Concrete control joints |
Revit Building >> Technical Support
|
Thu, Mar 31, 2016 at 1:52:27 PM
|
11
|
|
Control Joints |
Community >> The Studio
|
Mon, May 29, 2006 at 6:10:23 PM
|
3
|
|
|
Site Stats
Members: | 2161655 | Objects: | 23325 | Forum Posts: | 152479 | Job Listings: | 3 |
|