Forums
|
Forums >> Revit Structure >> Technical Support >> Wall "bumpouts"
|
|
|
active
Joined: Thu, Aug 21, 2008
44 Posts
No Rating |
I am drawing in walls which consist of 6" stud and brick. There are several 4 to 6" bumpouts in the wall. I have attached two images. The first, AutoCAD View, is what it is supposed to look like. When I draw them in Revit, I cannot get them to look right. The second image, Revit View, is what I am getting. Can somebody give me suome guidance on fixing this? Thanks, in advance. Mike
|
This user is offline |
|
 | |
|
|
site moderator|||

Joined: Tue, May 22, 2007
5921 Posts
 |
Did you use the "Join Gemetry" between them???? The layers have the exactly same name and material???
Edited on: Fri, Dec 19, 2008 at 5:46:03 AM
-----------------------------------
I Hope and I Wish to LEARN more, and more, and more.... REVIT |
This user is offline |
|
|
|
active
Joined: Sat, Dec 29, 2007
286 Posts
 |
Revit sucks at those type of connections, Playing around with the disalow join when rightclicking in the little bleu circel when selecting a wall and the join geometry could help, but if the design isnt going to change much i suggest just making it as good as possible looking in 3d and elevation and the masking region your plan.
-----------------------------------
"There is no path to peace,
peace is the path."
Mahatma Gandhi.
|
This user is offline |
|
|
|
site moderator|||

Joined: Fri, Feb 10, 2006
1874 Posts
|
are these the type of bumpouts you are trying to do. if so i will try and give you some help.
-----------------------------------
best regards, coreed,aia bmpArchitects,Inc. "Revit has to be implemented, Not installed." Long Live Revit |
This user is offline |
|
|
|
active
Joined: Thu, Aug 21, 2008
44 Posts
No Rating |
That is exactly what I am trying to achieve. Any help you can give me would be great.
|
This user is offline |
|
|
|
site moderator|||
Joined: Fri, Feb 10, 2006
1874 Posts
|
Step One http://screencast.com/t/9zCq2reN Step Two http://screencast.com/t/Dh6DNq4K That message about wall overlapping, just change the thickness of the stud in the second wall so that you don't get that message. HTH
Edited on: Mon, Dec 22, 2008 at 2:16:43 PM
-----------------------------------
best regards, coreed,aia bmpArchitects,Inc. "Revit has to be implemented, Not installed." Long Live Revit |
This user is offline |
|
|
|
active
Joined: Tue, Aug 9, 2022
0 Posts
No Rating |
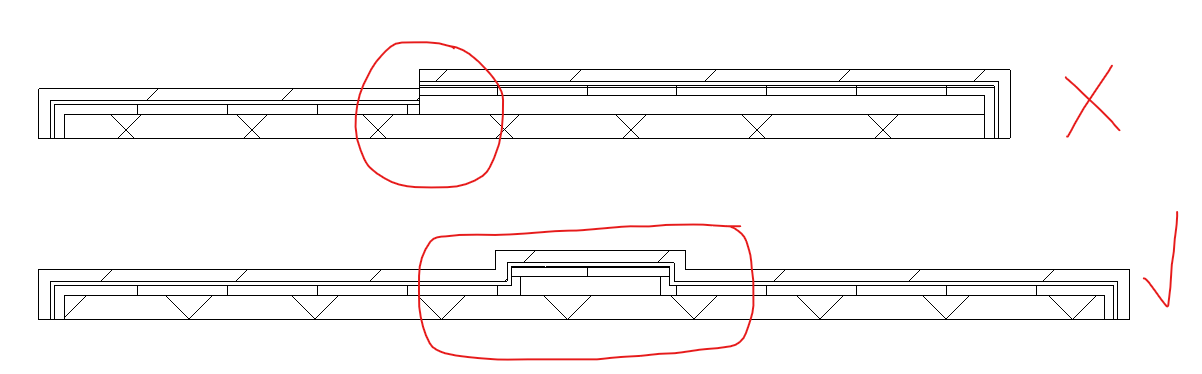
I wanted to add to this thread because I was having the same issue and @Coreed screencasts no longer work. Here's my solution:
- I have an exterior wall that has brick over CMU. I duplicated that wall, and added an additional structure layer with 6" metal stud (I want my bumpouts to be 6").
- Using the wall tool with the original brick over CMU wall type selected, draw your wall jogging it the desired dimensional amount. In my case it was 6".
- Select all the sections of wall that are "bumped out" from the main wall surface. Change those wall-types to the duplicated version you created in step 1.
- Use the align tool, to align the interior or exterior face of the CMU (or primary structural layer). Now the other layers of the wall (finish, insulation etc.) wrap around the bump out as desired.
See image for reference below. Hope this helps!
|
This user is offline |
|
|
|
active
Joined: Mon, Sep 19, 2022
0 Posts
No Rating |
Birko-Flor® is exclusively made for BIRKENSTOCK. The top efficiency, skin area-friendly, tear amount of resistance and straightforward-proper care fabric can be purchased in nubuck and patent accomplish. Styles like should be your picks if you're looking for vegan options with panache. cheap Birkenstock sale
|
This user is offline |
|
|
|
Similar Threads |
|
I can't see "Height" parameter value of Wall or Currtain Wall Schedule? |
Revit Building >> Technical Support
|
Thu, Apr 27, 2017 at 2:04:39 AM
|
4
|
|
wall wrapping at curtain wall "inserts" |
Revit Building >> Technical Support
|
Tue, May 20, 2008 at 6:29:51 AM
|
5
|
|
changing the "family" and "type" names |
Revit Structure >> Technical Support
|
Mon, Apr 2, 2007 at 5:33:49 PM
|
3
|
|
Basement Wall Function: "Foundation" or "Exterior"? |
Revit Building >> Technical Support
|
Fri, Mar 26, 2010 at 12:27:21 PM
|
1
|
|
tagging by "family name" and "family type" |
Revit Building >> Technical Support
|
Mon, Jun 1, 2009 at 8:54:54 PM
|
1
|
|
|
Site Stats
Members: | 2161655 | Objects: | 23325 | Forum Posts: | 152479 | Job Listings: | 3 |
|