|
Forums >> General Discussion >> Revit Project Management >> Applying Materials To Cover A Hole
|
|
|
active
Joined: Tue, Jan 22, 2008
13 Posts
No Rating |
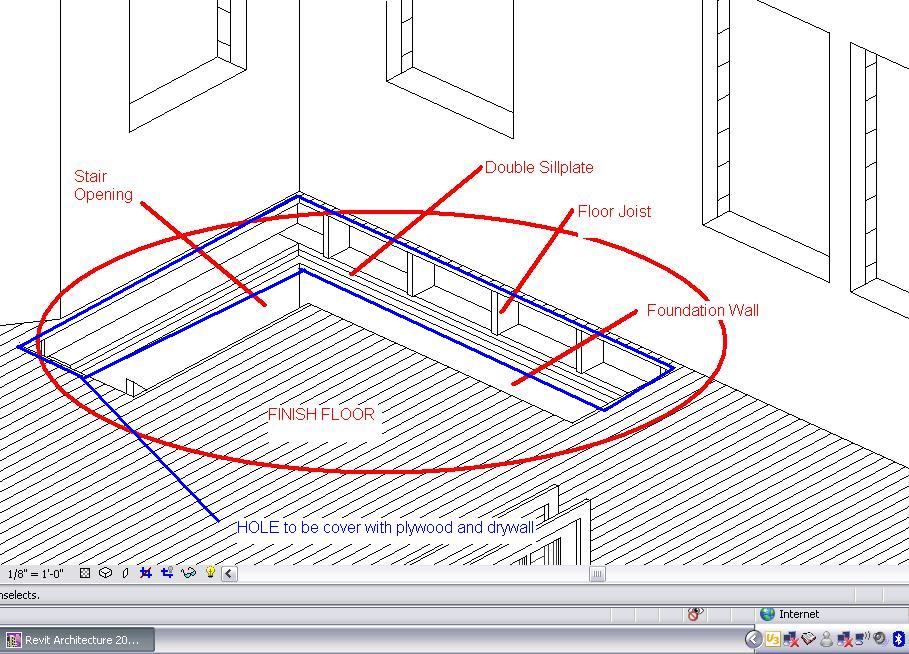
Hello ... I have a question... maybe u can help me out quick.... since im new to revit ..... i really dont know quite well about how to use some commands and tools... i got an issue with an stair opening and its adjacent wall.... im attaching a picture so u guys can see, that im having a hard time to cover the hole where the floor joists and the sillplate are.... i have an 8' foot tall foundation/basement walll and in the top of this wall a double sillplate and the floor joists above.. when i cut my opening for the stairs it exposes the materials... in the reality... that hole will be cover with plywood and drywall so u wont see the floor joists and the sillplates... but i dont know how to extend the materials from the wall to cover the hole.... What i need to know is how can i cover that hole... so im not gonna see that hole where the joists are when im descending form my stairs to the basement THANKS!!!!!!!!!!!!!
|
This user is offline |
|
 |
|
|
|
active

Joined: Wed, Oct 3, 2007
22 Posts
No Rating |
If I understand this right, then my suggestion would be, that you put a custom wall structure right beside your current "8' foot tall foundation/basement walll and in the top of this wall a double sillplate and the floor joists above", adjust the heigh so it will go from bottom to top. By custom wall structure I mean you modify your own wall by setting the layers like you want them to be ("plywood and drywall" . So choose wall, then edit it in the properties dialog (remember to duplicate an existing wall and renaming it, so you won't loose the first wall) and put your layers in the structure... understand? . So choose wall, then edit it in the properties dialog (remember to duplicate an existing wall and renaming it, so you won't loose the first wall) and put your layers in the structure... understand?
|
This user is offline |
View Website
|
|
|
active
Joined: Tue, Oct 9, 2007
285 Posts
 |
You can do what Majlo is sugesting but the question is do you really need/ want to model that portion of the wall? Is it going to show up in a 3d rendering, multiple sections or just one section? If this is the only view that this hole will show up in you may just want to use detail lines, filled regions etc to corectly represent it in section. As a general rule of thumb try not to over model otherwise your file size can get very large very fast. Nick
|
This user is offline |
View Website
|
|
|
active
Joined: Tue, Jan 22, 2008
13 Posts
No Rating |
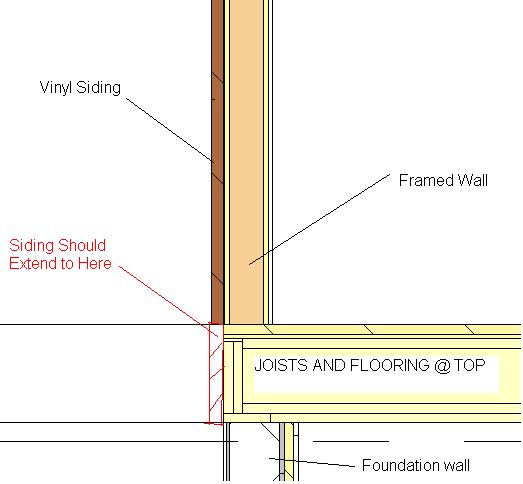
Ok thank you i got that... its just that im trying to cover all of those structural wood elements that im using to construct the building. i dont want them to show on my building, even for the exterior i got the same problem ... im always presenting my models with those wood joists and rim joists showing up.... look im attaching 2 pictures that will show you what my problem is when im constructing my models..... i need to be able to cover those guys with the material that im using for the exterior side... actually the vinyl and the plywood(in the outside) should extend over the rim joists and cover that up. same thing for the interior (plywood & Drywall) iguess.... THANKS
|
This user is offline |
|
|
|
active
Joined: Tue, Oct 9, 2007
285 Posts
|
You can go to the wall, element properties, edit/ new and edit the structure. Expand the preview and change it to section. Zoom into the very bottom, select modify and pick the bottom segment of the layer that you want to extend. After you select the bottom segment a little lock button appears. Unlock the padlock and select ok all the way out. Now you can go into a section of that wall, select the wall and there are now 2 pull down arrows. You can now pull the finish down independantly of the wall. Be careful as this will affect the wall entire wall type (all walls of that type in your project will now have the finish dopped) so you may need to duplicate the wall type several times in order to get evertything modeled coreclty. HTH Nick
|
This user is offline |
View Website
|
|
|
active
Joined: Tue, Jan 22, 2008
13 Posts
No Rating |
This was the anwser that i was looking for.... THANKSSSSSSSSSSSSSSSSSSSSS This trick help me a lot... thank u nick.!!!!!!!! I guess this method will also let me model the hole in the inside.... THANK YOU VERY MUCH !!!!!!!!!!!!!!!!!!!!!!!!!!!!! Julio Daniel Saavedra
|
This user is offline |
|
|
|
active
Joined: Tue, Jan 22, 2008
13 Posts
No Rating |
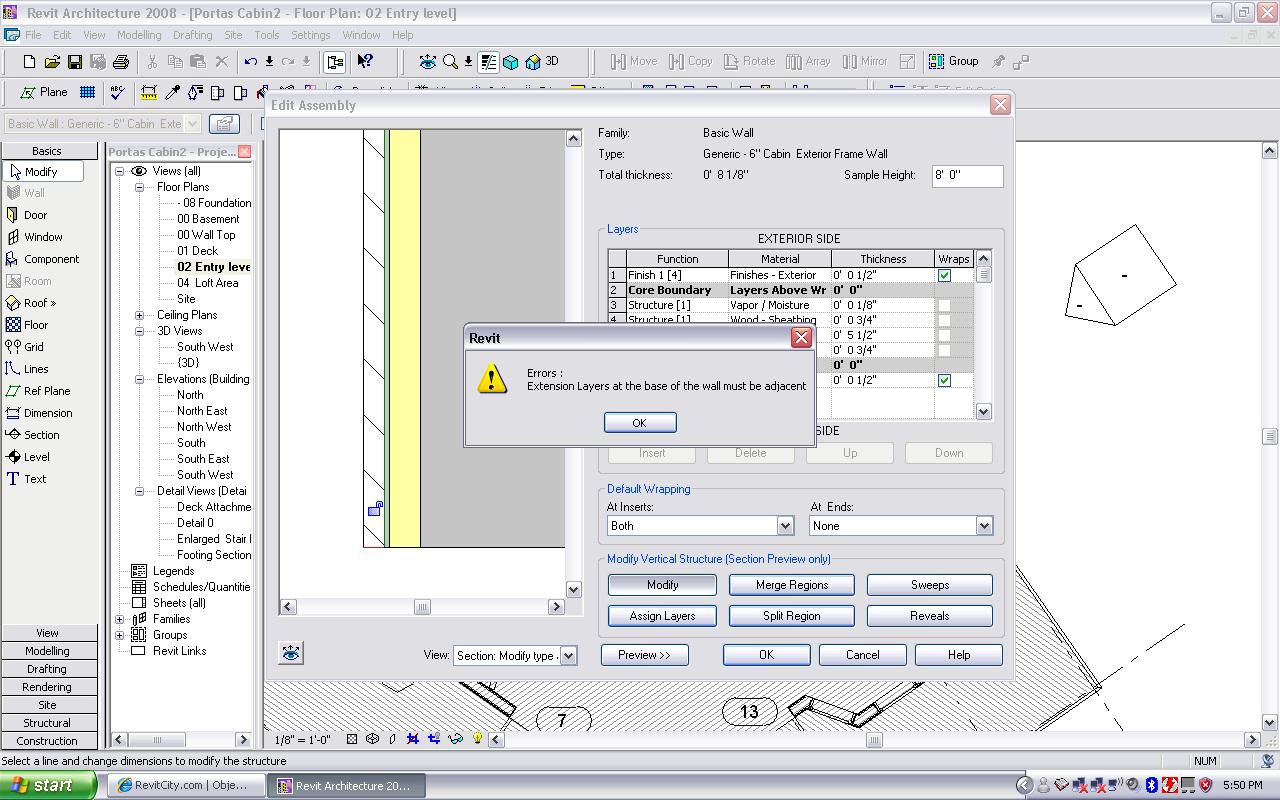
ok i tryed the thing and it works for just one layer or "adjacent layers" when it comes to do it for more than one layer and the layers are not right next to each other... it wont work this message keeps coming up... (SEE THE PICTURE BELOW) Any suggestions.....
|
This user is offline |
|
|
|
active
Joined: Tue, Oct 9, 2007
285 Posts
|
Are you trying to extend the finishes in the wall edit mode? If so you cant do it there. You need to draw a section through the actual model and make your changes there. See my previous post. Why would you want to pull down non adacent layers? Wouldnt you extend all of the finish layers non every other one? I guess if you really need to do this then you would have to create 2 walls directly next to each other. Nick
Edited on: Mon, Mar 3, 2008 at 9:50:04 AM
|
This user is offline |
View Website
|
|
|
active
Joined: Tue, Jan 22, 2008
13 Posts
No Rating |
The reason why im trying to pull down 2 non adjecent layers its because, remember that the same issue that i got for the exterior (trying to cover those rim joists) i got it for the interior, and i can see the exposed joists and lumber at the stairs opening.... the way that i set up my wall its this: Drywall/Plywood sheating//// STUD //// Plywood Sheating / Vinyl Siding So i was trying to extend for the outside the vinyl siding and for the inside the drywall but the thing is that the stud layer i dont want it to extend or past down ... so technically because the stud it is in between the 2 finishing layers do not become adjacent and i cant make it happen. i tryed the the edit profile mode but that extends the whole wall and actually its kind of a "reshape" wall tool Thanks!
|
This user is offline |
|
|
|
active
Joined: Tue, Oct 9, 2007
285 Posts
|
If yor interior and exterior finishes are at the same height you can just move the core. Otherwise you would just have to add a second wall that just consists of the finishes for either the interior or exterior. Not everything in Revit is perfect, the keyword is workarounds. Nick
|
This user is offline |
View Website
|
|
|
|
|
active
Joined: Tue, Jan 22, 2008
13 Posts
No Rating |
I finnaly had to build another wall adjacent to the hole so i can "cover that up" Revit its not perfect neither we are.... but as you said the key is play around until you get what u need.... I have to say thank you very much nick.. i appreciate the time and effort following the thread... i learned a lot of new stuff... THANKS A LOT!!!!!!!!!! Julio Daniel Saavedra
|
This user is offline |
|
|
|