RevitCity.com Logo

Home  |  Forums  |  Downloads  |  Gallery  |  News & Articles  |  Resources  |  Jobs  |  FAQ  |  SearchSearch  |  Join  |  LoginLogin

Welcome !

61 Users Online (59 Members): Show Users Online - Most ever was 626 - Mon, Jan 12, 2015 at 2:00:17 PM


Forums

Forums >> Community >> Newbies >> Best approach to Photo Realistic Renderings?

Search this ThreadSearch this Thread | Page 2 of 2 | << Previous 1 | 2

Thu, Dec 13, 2012 at 3:40:13 PM | Best approach to Photo Realistic Renderings?

#16

CDWdavid


active

Joined: Mon, Aug 4, 2008
153 Posts
5 Stars: 5 Votes


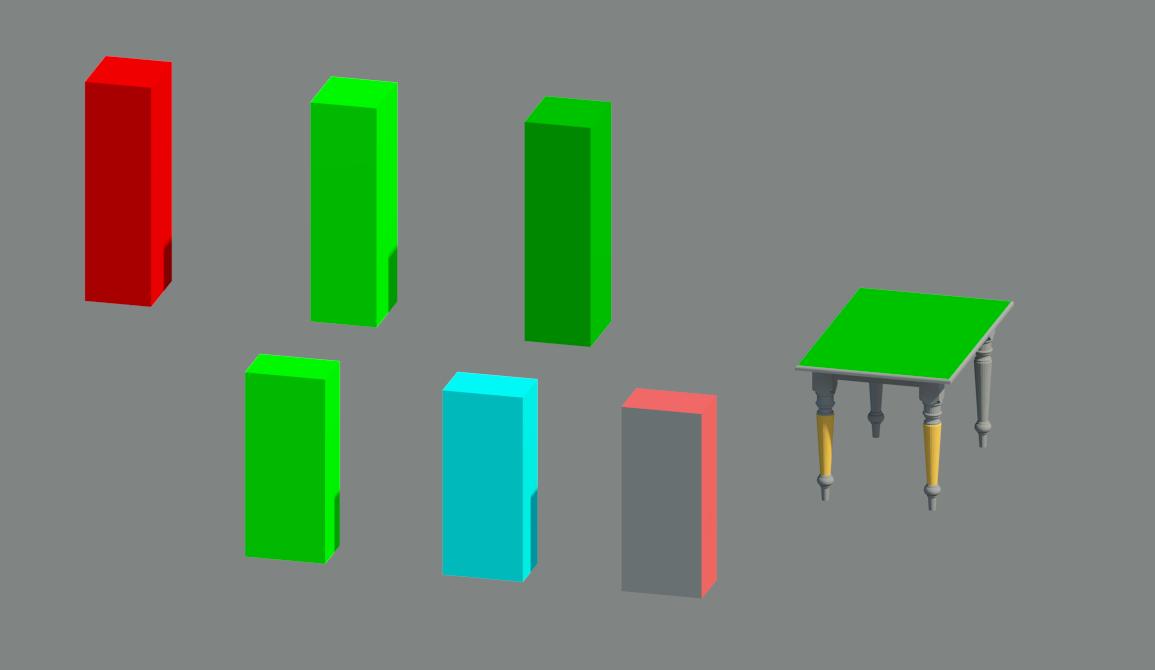
Tips to control the colors on imported SketchUp objects. Please see attached Revit rendering.

The columns in back row are all have no surface paint, in the front row the one on the right with paint color was shown gray. The green table top and the part of those two front legs whit yellow color have no surface paint.

Here is how to set the color for imported SketchUp objects.

1. In SketchUp: NEVER USE PAINT BUCKET! In order to create a complicated object, we have to use lots of components. If any surface in any component has surface "paint", it would be very time consuming to undo it.

   a. Create layers as needed, the table has "Top" and "Wood" layers.

   b. Assign color to each layer.

   c. Open "Layer Manager", at top right, click that arrow, select "Color by layer".

   d. If any surface already received paint, do the followings:

- open the "Entity Info" window, select that surface.

- two rectangular boxes will be shown on the left.

- change both to "Default".

- go back to do the step as in 1.c. above.

2. In Revit 2013: Insert that object into the Revit file, under "Import CAD", change "Files of type" to "SketchUp Files".

  After the file imported, do followings:

   a. Go to "View", click "Visibility/Graphics", on the very top, click "Imported Categories".

   b. On the bottom left click "Object Styles".

   c. Find the layer, for example "table", "Top", in my case.

   d. Click the "Top", then in "Material" column click the box on the right, the "Material Brower" will be shown.

   e. Move the cursor to there, on the right in "Category" column, open "Material Editor", pick "Appearance Properties", change the color as you like.


That's it. Enjoy!

I’ll post it in “Tips & Trick”, under “Color control for imported SketchUp files”.


Attached Images

114310_SketchUP-Colors.jpg

This user is offline


Search this ThreadSearch this Thread | Page 2 of 2 | << Previous 1 | 2


Similar Threads

Thread/Thread Starter

Forum

Last Post

Replies

photo-realistic rendered walkthroughts

Revit Building >> Technical Support

Wed, Jul 22, 2009 at 5:43:21 PM

5

Advice For New Windows Laptop

Workflow & Implementation >> Hardware

Sat, Feb 16, 2019 at 6:28:31 AM

0

Need recommendation on best source for people in renderings.

Revit Systems >> Technical Support

Wed, Jul 5, 2017 at 3:48:40 PM

1

Rendering

Revit Building >> Technical Support

Wed, Jul 20, 2011 at 1:14:25 PM

1

Interior Rendering Components

Revit Building >> Tips & Tricks

Mon, Oct 11, 2010 at 2:43:49 PM

0

Site Stats

Members:

1994893

Objects:

22882

Forum Posts:

152181

Job Listings:

3

Sponsored Ads

Home | Forums | Downloads | Gallery | News & Articles | Resources | Jobs | Search | Advertise | About RevitCity.com | Link To Us | Site Map | Member List | Firm List | Contact Us

Copyright 2003-2010 Pierced Media LC, a design company. All Rights Reserved.

Page generation time: 6.1826

Login

User Name:

Password:

Remember Me  

Forgot Password?

Search Forums

Advanced Search

Search Forums

Advanced Search


Clear Highlights


Clear Highlights